Thursday, December 24, 2015
How to use a Schlemmertope...Roasted Chicken and Vegetables


A few years ago the tradition of German Christmas was born, when my German friend was missing home and the cooking traditions of her childhood. I thought the first adventure in German food was a hoot, when we set off the smoke detector. However, this second journey did not disappoint, as it was complete with getting the lid of the schlemmertope stuck, a visit from a coyote on the patio and very educational and lively discussion about men, marriage and life.
For the second annual dinner, we decided to make some German comfort food and let me just say I fell in love with the Schlemmertope because it is easy, cozy, low maintenance and looks impressive.

Next layer the ingredients of the meal in the dish. This can be used to cook just about anything, however we decided to roast vegetables and chicken. I would love to share the actual recipe with you, however it is in German and I can't tell you what it says at all, so this is my interpretation.

We did a layer of onions, we used 4 of them, that we cut into quarters. We also added 6 Roma tomatoes, that we also quartered. And 6-10 Yukon gold potatoes,the small ones, that we cut in half. We tossed the veggies in salt, pepper and paprika. However, you could easily add some fresh herbs, other veggies like red peppers or cauliflower or artichokes, and it would all cook beautifully.

On the top of the veggies, we layered boneless, skinless chicken thighs, that were also seasoned in salt, pepper and paprika.
Place the top on the schlemmertope and place it in the oven, on the lowest rack. One of the things to make note of is the fact that you always want to put a schlemmertope in a cold oven, as this eliminates the possibility of cracking the clay, which is never a good thing.
Cook the chicken and veggie mixture in the oven for 2 hours in a 395 degree oven. Ok to be exact the exact oven temperature is 392 degrees as it was translated from German into English, however we were crazy and rounded up to 395.

And that is it. The chicken was cooked perfectly, it was tender, juicy and fell apart on the fork. The veggies were steamed to perfection and there was a broth that was created at the base of the schlemmertope from the cooking process that was awesome spooned on the veggies or the chicken.
This is a perfect dish for entertaining as it looks exciting and original, doesn't require you to be lost in the kitchen while your guests meander around your house and it is the perfect conversation piece. Our 2nd Annual German Friend Christmas was a true success, starting with mimosas while we prepped, German language lessons on how to say Santa in German (aka. Weihnachtsmann) and a lot of laughter, good wine and friendship. We truly embraced the spirit and traditions that embody Christmas, sharing and being grateful for what is truly important-health, friendship, joy and love. Merry Christmas!
Monday, December 21, 2015
Malibu Farm-Malibu, California

Do you ever have those moments in time when you are just straight up grateful? I am not sure if it is the time of year, the turquoise blue water of the Pacific Ocean, the company of one of my best friends, incredible food and wine or just the fact that I am getting older or more sentimental, however whatever it was, the few hours I spent at Malibu Farm yesterday made me grateful. This restaurant is truly one of the best kept tucked away secrets in Southern California. Malibu is known for high end big named restaurants like Nobu, which don't get me wrong has incredible food, however if you want to sit and enjoy the sun, surf and the beauty of the West coast, Malibu Farm is my choice any day.

I have lived in Southern California for 10 years now, this week is actually the anniversary of my move. I remember moving down here like it was yesterday, the long drive from Nor Cal to So Cal, the rain on the windshield of the Uhaul truck, moving on the 23rd and realizing that after 30 years it was my first Christmas away from home and unpacking the Uhaul truck in 80 degree weather in December in shorts and a tank top. I moved down here to chase love and to chase a career, but at the end of the day my life has turned out nothing like I expected and for that I am grateful. The love and the career have changed and the last 10 years have been a roller coaster of life lessons, heart breaks, celebrations and those moments like yesterday that just leave you grateful.

Malibu Farm is on the Malibu Pier. Yes, Malibu has a pier. It is often an overlooked pier as it is overshadowed by the more famous piers like Santa Monica or Santa Barbara, however it still juts out into the beautiful Pacific Ocean.

The restaurant occupies the two buildings that are located on the pier. There is one at the start of the pier and one at the end, both with incredible views, amazing food and a relaxed, beachy and classy vibe.

One of my best friends and I decided to escape the holiday craziness yesterday and spend the afternoon enjoying each others company, a bottle of wine and exploring some good food. Malibu Farm specializes in farm to table ingredients, local sources, organic fruits and vegetables when possible and whole ingredients. The food is simple yet creative, decadent and comforting all at the same time.

We started the afternoon, after walking the pier, with a bottle of local wine from Malibu. We decided on the 2013 Dolin Chardonnay and it was perfect for a warm sunny winter afternoon. It was crisp with a hint of citrus and light oak. We sat on the patio, yes in December, which has glass to shield the wind, heaters although they weren't necessary until the sun started to set and blankets.


The next thing we tried was the Veggie Paella, however we added some grilled steak. The paella was not made in the traditional fashion as it was made with Israeli couscous instead of the traditional rice. It also had incredible grilled veggies such as sweet potatoes, beets, artichoke and green beans. It was topped with a combination of tofu and grilled steak, which was cooked perfectly. The flavors were perfect, not overpowering, but exotic.

Finally, we ended the meal with lattes and Lavender Coffee Cake and yes that is actual coffee on the top of the cake. The lavender was subtle, however the coffee cake was heaven as it was served with a side of toasted pecans and whipped cream.

It truly was the perfect ending to an incredible meal. Actually I should say we ended the meal by watching the sunset over the ocean, celebrating our friendship and recognizing all that we have to be thankful for during this holiday season.

Here is the info on the restaurant. I promise you will not be disappointed! https://www.malibu-farm.com/about-malibu-farm/
Thank you to all of those people, places and things that touch my life on a daily basis. My life has been filled with an incredible family and friends, an ongoing life adventure, moments that capture my heart, places that make me celebrate being alive and for that I am just grateful. Happy Holidays!
Wednesday, November 25, 2015
Cranberry Pear Crisp

I was looking for the ultimate Fall dessert for a party I was attending this week and when I was perusing an old edition of Food Network magazine I discovered exactly what I was looking for-Cranberry Pear Crisp. In the past, I had never been especially passionate about cranberries, but I loved the color and I decided that with the sweet pears it shouldn't be too tart. And this recipe was perfect!!


This recipe was also incredibly easy. Toss the fresh and dried cranberries in a bowl with the sugar, water and vanilla. Mash the cranberries with a potato masher to get some of them to pop and ooze, wait that sounds disgusting doesn't it? But you know what I mean!

Add the pears, which are peeled and cut into 1/2 inch pieces, cinnamon, allspice and flour. Toss the entire mixture into a 3qt dish. I used a 9x13 baking dish, if that helps.

Next make the topping, which consists of flour, pecan, oats, sugar and salt. Stir in melted butter and mix until it is crumbly. Sprinkle over the cranberry/pear mixture.


Bake for 40 minutes and serve warm or room temperature.

This is truly just comfort food. It is cozy, fulfilling, nourishing and nurturing. I loved the flavors, the color and the ease of baking! I promise you will not be disappointed. Cheers and Happy Thanksgiving!
Monday, November 9, 2015
I molested a dead squid...and made calamari!

I know the word molested is a bit harsh, however there is just no other way to describe the experience of cleaning a dead squid. You full on, straight up, violate that deceased creature and it is by far one of the grossest culinary experiences I have yet to encounter.

And that is saying a lot seeing as I have had some pretty gross cooking adventures-killing a lobster with a knife to the spine and cleaning out fish guts to fillet the animal being amongst two of the highlights.

However, learning how to clean a squid has definitely taken my cooking gross-out factor to the next level. Even if you have not touched raw squid, you can imagine it being of a slimy consistency, right? Well now try sticking your finger inside of that, it feels kind of like snot and well not to be completely graphic, but I am going to be, kind of like sticking your finger in a used condom. It is truly sensory disgusting!!

Oh but wait, it gets worse, because while your finger is inside the squid you now have to grab a cartilage piece that feels like plastic and grab on for dear life as you wrestle it out of the creature...because seriously no one wants to bite into plastic in their calamari. The gag reflex was high during this kitchen journey!

This amazing night occurred for me in the suburbs of Atlanta, Georgia. A dear friend offered to teach me how to make calamari and of course I jumped at the offer. I also brought along a new co-workers, whom I had never met, because with my friends and family the more the merrier, right? There were also several family members of mine present to watch this nightmare unfold. Nothing like being traumatized with an audience, right? Yup they all got to watch as I stuck my finger inside a dead animal and tried not to vomit on their appetizers.

Anyway, I digress, once you remove the cartilage and the snot from inside the animal, you wash them under the faucet, kind of like creating a squid water balloon. Yes, I know what you are thinking...it is like adding insult to injury to this sea life form...first you violate it and then you play with it and transform it into a water balloon. Yup, you got it! Exactly!

So after we get done cleaning all of these animals, my friend leans over to me and tells me that you can purchase squid already cleaned. I didn't know whether to laugh or cry, so I did a little of both. Therefore, if I ever make calamari again or if you want to try this at home, I highly recommend that you purchase it already cleaned.
Once the squid has been cleaned, slice into rings, kind of like you are slicing a banana. Super easy!
Next dust in rice flour and salt. There are different recipes that call for different types of flour, but my friend swears by rice flour and it tasted delicious. Yup, event after molesting the squid I still ate it!!

Heat your peanut oil in a wok until it gets to a very high heat (we didn't measure the temp but this is what it looked like) and throw the squid in the hot oil. Remove from the oil, drain and eat!

Do not over cook them...that is the fastest and easiest way to ruin calamari...and after all of the hard work that would just be straight up sacrilegious to destroy this delicacy.
Yup, I am pretty sure after my luscious description you are all craving calamari about now...so cheers!! Don't forget to indulge in a glass of pinot grigio or sauvignon blanc with this delectable appetizer. Yum!!
Friday, October 9, 2015
Cheese Corn Appetizers
Let me start by saying that I apologize for being MIA for the last few months. My life has been full of some big changes and it has taken me awhile to find a new work/life balance that included finding time to cook, eat and write. Well, to be honest, the eating part has been easy, it is the cooking and writing part that has been more of a challenge. I started a new career doing public safety software training and it has me traveling every week, which is fun in terms of exploring new regions and new foods, but also finds me damn tired by the time I fly home on a Friday night. I am starting to get into the groove and really recognize that I need to get back to what I love, which is writing about food and sharing my journey with those who enjoy to read about it.
As some of you know I have what some people may call an obsession of sorts. I love appetizers!! I think it is just fun food and there is something about an appetizer that instantly makes the day or event feel more festive. It is also a great way to try different kinds of foods without stealing bites off of peoples plates, which some people find offensive. I think they are just dead wrong, but I still don't care to be bitch slapped for trying to take a bite of a strangers food. On a side note, but seriously if you put the tables so close together that I can reach the other table with my Tyrannosaurus Rex arms than that food should be consider fair game, just saying.

Back to appetizers. I made these appetizers that I found in an old Rachael Ray magazine for a July 3rd party I went to. In my area, they do fireworks not only on the 4th of July, but also on the 3rd...don't ask...it is So Cal...they just do their own thing. Anyway since I failed to write about them back in July and it is corn and harvest season I decided to share this yummy appetizer recipe now. In my opinion if there is a recipe that combines chips and cheese I am just all over it, it is one of the closest things to heaven in my opinion...especially if you throw in a glass of wine...which we did!! Love it!!

So to begin with, combine cream cheese and shredded pepper jack cheese, frozen corn and an egg. I am sure you can also use fresh corn, but the recipe does call for frozen. Take scoop shaped chips and place a dollop of filling on each chip.

Yeah this is probably the most technical and time consuming part of the recipe....cheers to simple and tasty food!!
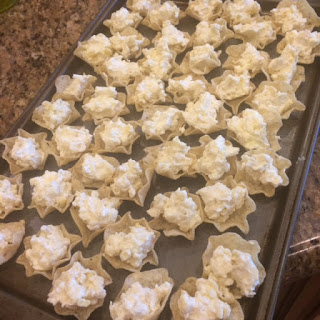
Bake the stuffed chips in a 350 degree oven for 20 minutes. Sprinkle with chives and serve. Seriously does not get much easier than that!! These appetizers were a big hit!! They were creamy and the filling almost reminded me of a savory cheesecake and the corn from the filling and the corn from the chips complimented each other perfectly!

If you want to add some more spice the recipe also said you could add fresh jalapeño or chipotle chiles in adobo sauce, however I was cooking for a family event and I didn't want them too spicy. It also said you could try adding olive tapenade, salsa or black beans and I honestly think any of those options would be tasty!!

Here is the actual recipe:
ingredients
8 ounces cream cheese, at room temperature
1 cup shredded pepper Jack cheese
1 large egg
1/2 ounce corn kernels
48 scoop-shaped tortilla chip (one 10-ounce bag)
Chopped chives or cilantro, for sprinkling
directions
Preheat the oven to 350 degrees . In a large bowl, mix the cream cheese, pepper jack cheese, egg and corn.
Arrange the chips on a large rimmed baking sheet and place 1 teaspoon corn mixture in each. Bake until the filling sets, about 20 minutes.
Sprinkle the corn bites with the chives; serve warm.
I have definitely been to some amazing restaurants and taken some incredible food pictures so I can't wait to get into more of a writing pattern again so I can share with you all. Cheers!!
Saturday, July 25, 2015
Huevos Rancheros in Tortilla Cups
I am absolutely loving my new gig where I get to travel...a lot!!! However, one of the first things I crave when I get home is my kitchen. There is something just nurturing and relaxing about being in the kitchen...cooking. And so far the last few weeks one of the first things I do when I get home is to cook. Don't get me wrong I am loving exploring new restaurants, bars and experiences on my travels, however at the end of the week I just want home cooking. This weekend I continued this tradition by making Huevos Rancheros in Tortilla Cups.

The first part of this recipe consisted of the construction of the tortilla cups. When I read the recipe I thought this was brilliant...take a muffin tin and invert it, drape the tortillas over the cups and mold into a bowl and bake....until I tried it...and it looked like this.

The tortillas decided to break on me, they continued to move on me and not drape or shape and I was pretty sure I was going to bake these and they were going to look like tostadas. I was already envisioning putting my pictures on Pinterest as an epic fail, when I pulled them out of the oven, only to find that they looked pretty darn good!! This was cause for a kitchen celebration of sorts, also known as a kitchen happy dance!!

From that point on I was pretty cocky about this recipe. I combined the diced tomatoes, black beans, chiles, cilantro, cumin and red hot sauce in a pan and brought to a boil. I simmered the mixture for 4 minutes and it started to make my house smell so good!!

Next I cracked the eggs into the pan and placed the entire pan in the oven for 6-8 minutes. If you like your eggs over hard like I do, go the full 8 minutes. And oh yeah please remember to use an oven proof pan otherwise you may have a potential hazardous materials spill on your hands...not fun!!

Sprinkle cheese on the eggs and bake for another 1-2 minutes, just so the cheese melts.

Fill your tortilla cup with the bean mixture and the egg, sprinkling the top with leftover cilantro.

This recipe had a lot of good flavor. It was a little spicy from the red hot sauce and the chiles and the cilantro and cumin gave it some nice earthy flavors. It was also packed full of protein and it was healthy, which is always a good thing after a week of eating in restaurants.
Here is the actual recipe:
4 medium corn tortilla(s), 6 inches
14 oz canned diced tomatoes, with green pepper, celery, and onion
15 oz canned black beans, rinsed and drained
1/2 cup(s) canned green chili peppers, mild, diced
3 Tbsp hot pepper sauce, or to taste
3/4 tsp ground cumin
3 Tbsp cilantro, chopped
4 large egg(s)
1/4 cup(s) low fat shredded cheddar cheese
Place the oven rack in the center of the oven; preheat the oven to 425ºF. Lightly spray both sides of the tortillas with nonstick spray. Place 4 inverted custard cups on a baking sheet, and drape a tortilla over each to give it a bowl shape. (You may also use an inverted 12-cup muffin pan, placing the tortillas over alternate cups.) Bake until the tortillas are crisped and lightly golden around the edges, 10 minutes. Remove the tortillas and set them on a rack to cool.
Combine the diced tomatoes, beans, chiles, pepper sauce, cumin, and 2 tablespoons of the cilantro in an ovenproof skillet. Bring to a boil over medium heat, reduce the heat to low, and simmer until the flavors are blended, 4 minutes. Break the eggs one at a time, on top of the sauce, spacing them evenly apart.
Immediately place the pan in the oven and bake until the eggs are almost set, 6–8 minutes. Sprinkle the cheese on top of the eggs and bake until melted, 1 minute. To serve, place the tortilla cups on serving plates and spoon the eggs and sauce into the tortilla cups. Garnish with the remaining tablespoon of chopped cilantro and serve immediately. Yields 1 filled tortilla cup.
Hope you all have a fabulous weekend! Cheers!
Monday, July 6, 2015
Fresh Peach Cobbler

I was pretty excited when I got invited to a Summer BBQ and I was asked to bring dessert. For me, there is nothing that feels more like summer than peaches. I remember being so excited during peach season as a kid and I would always eat the super hard ones and just love every second from the taste to the crunch to the fuzz on the skin.
 |
| I used organic peaches |
However, although I have always loved peaches, for some weird reason I had never tried to make a peach cobbler. I quickly found a recipe at www.allrecipes.com for a Southern Peach Cobbler and decided this was the direction I was going to go.

The hardest part of this recipe truly was peeling the peaches. Dang peaches can be slippery suckers!! I had a few try to escape my grasp as I squeezed them with the peeler and I had one actually try and make a run for it, coating my entire kitchen in peach juice and moosh (yes, that is totally a technical term).
 However, one you have peeled the peaches, slice them into thin wedges. Just as a reminder, try to make them uniform in size so they cook at about the same rate.
 |
| Before baking |
Toss the peaches with the white and brown sugar, cinnamon, nutmeg, lemon juice and cornstarch. Bake the mixture in a 425 degree oven for 10 minutes. I had never seen this technique in a recipe before, but it really helped cook the peaches to perfection without over browning the crust.
 |
| After baking |
Next, combine the flour, white and brown sugar, baking powder and salt. Use a pastry blender and mix in the butter. Finally, add the boiling water and combine just until mixed.


When the peaches come out of the oven, drop spoonfuls of the dough mixture on the peaches. Remember it does not have to look pretty as it is all going to blend together and create it's own abstract art with or without you.

Top the dough and peaches with cinnamon and sugar. Bake for 20-30 minutes.
Ingredients:
8 fresh peaches - peeled, pitted and sliced into thin wedges
1/4 cup white sugar
1/4 cup brown sugar
1/4 teaspoon ground cinnamon
1/8 teaspoon ground nutmeg
1 teaspoon fresh lemon juice
2 teaspoons cornstarch
1 cup all-purpose flour
1/4 cup white sugar
1/4 cup brown sugar
1 teaspoon baking powder
1/2 teaspoon salt
6 tablespoons unsalted butter, chilled and cut into small pieces
1/4 cup boiling water
MIX TOGETHER:
3 tablespoons white sugar
1 teaspoon ground cinnamon
Directions:
Preheat oven to 425 degrees F (220 degrees C).
In a large bowl, combine peaches, 1/4 cup white sugar, 1/4 cup brown sugar, 1/4 teaspoon cinnamon, nutmeg, lemon juice, and cornstarch. Toss to coat evenly, and pour into a 2 quart baking dish. Bake in preheated oven for 10 minutes.
Meanwhile, in a large bowl, combine flour, 1/4 cup white sugar, 1/4 cup brown sugar, baking powder, and salt. Blend in butter with your fingertips, or a pastry blender, until mixture resembles coarse meal. Stir in water until just combined.
Remove peaches from oven, and drop spoonfuls of topping over them. Sprinkle entire cobbler with the sugar and cinnamon mixture. Bake until topping is golden, about 30 minutes.
I really hate to brag, but I am pretty sure I knocked it out of the park with this recipe. It tasted fresh and the peaches were juicy and sweet without being too syrupy. The cobbler mixture was light and flaky and buttery and the cinnamon/sugar concoction on the top gave it a nice spice. It also helped that this recipe was easy and effortless and it is just a genuine crowd pleaser. It would also be amazing with vanilla ice cream or a Moscato dessert wine. Cheers!!
Subscribe to:
Posts
(Atom)
Visit My Website!


