Wednesday, March 27, 2013
Culinary School #3-Baking
So the class on Monday was all about baking. And let me just say it was a little overwhelming for me. We did break into groups again and I was designated "scone girl." And sure I had made scones before, but these scones took my skill set and knowledge to a whole new level. I have always thought of myself as a pretty damn good cook, but I am quickly learning that my technique leaves something to be desired, my culinary vocabulary is rudimentary at best and my knowledge of cooking accouterments is very minimal.
For example, do you know what a lame is? I have always thought that lame was a term used to describe something that was kind of boring or ridiculous or disabled. I learned this past week that in cooking lame is a tool that is used to score bread...kind of like a razor blade on a stick.

I also learned that when making French baguettes you need to create steam in the oven so that the baguette gets that crisp exterior and chewy interior.

There are all sorts of methods that can be used to get steam. Obviously large bakeries use steam injectors but for the home cooks I learned of two fairly simple ways to create steam. The first one involves putting a wet towel on a cookie sheet in the oven while you bake the bread and as it heats up it will emit steam. The other option which I saw the other night reminded me of creating a sauna in your oven. You take a baking pan, add rocks and chains, yes I said rocks and chains, adding water to them and as they heat up they release steam.

We made pie dough and as many of you know if you have been reading my blog for awhile, pie crust is one of my nemesis. It always tends to fall apart on me and just turns out a bit on the ugly side. Well one of the biggest tricks I learned is that if dough gets warm it becomes harder to work with. So the easiest way to remedy that is to put it in the fridge for a bit and then take it out and roll it out.
This tart dough was sticking to everything when I was trying to roll it out...my hands, my rolling pan, the counter, any random person who walked by...yes very embarrassing. Well I put it in the fridge for 20 minutes and it was like new dough. Rolled out perfectly. I also learned a cool trick...if you roll the dough out on parchment paper it is easier to get in the pan. Just pick up the parchment paper and flop it in.
 |
| My fruit tart-lemon curd w/assorted fruit |
I also learned that when making pie crust you should always keep the fat and liquid cold. One of the other fatal pie crust mistakes involves over handling it. This is a hard lesson for me because I really like to touch everything. When I am clothes shopping I touch all of the material. When I was a kid playing in the tide pools I loved to touch the starfish and put my little fingers in the sea anemones. So being told I shouldn't touch something as much was kind of a challenge.
Now let me share with you some of my new cooking vocabulary words:
- Crumb-texture of bread or cake
- Couche-perforated baguette pan that allows for a brown surface and chewy interior
- Proofing-Combining yeast with warm liquid and a small amount of flour or sugar. Let it rest at room temperature and if it foams the yeast is alive and if there is no foam the yeast is dead.
- Docking-perforating dough
 |
| Foccacia w/caramelized onions, peppers and Parmesan cheese |
As I mentioned the scones were my responsibility. So I made the scones with candied lemon peel. To candy a lemon peel you cook it in a simple syrup and then allow it to harden on a pan, chop it up and add it to the scones. We served the scones with a strawberry sauce and whipped cream that was flavored with the lemon simple syrup. Let me just say this was pretty much a slice of heaven!
 |
| Strawberry Sauce |
 |
| Candied lemon peel |
 |
| Scones w/Whipped Cream & Strawberries |
 |
| Yes, I touched every single one of these flours!! |
Now for a few just random baking tips that I picked up:
- Weight is the most accurate and consistent way to measure so we should all have a kitchen scale. I do not own one currently, but I will be buying one today.
- Never pre-measure vanilla because it evaporates due to the alcohol content as it sits out and causes the measurement to be off.
- Yeast should be kept in the freezer. Not on the counter where mine is right now
- Yeast should be brought to room temperature before preparing the dough
- Salt is added to yeast breads to develop flavor and control the yeast action.
- Never put a pizza stone in a hot oven. Put it in a cold oven and let it warm up with the oven.

I also had to turn in my chicken stock...which took me all day Sunday to make...and the feedback I received was that it was a little watery, but that it had a good chicken flavor. Let me just say homemade chicken stock is very time consuming. I probably spent a good 8 hours making my stock when you consider, shopping for the ingredients, going to the grocery store twice if you are me and you forget to buy the chicken, boiling the chicken, simmering it for 3-4 hours and cooling it for 2-4 hours. It was a great experience, but I still honestly think I am a fan of the canned chicken stock. Cheers!
Friday, March 22, 2013
Super Easy Easter Brunch Idea-Raspberry Nut Dreams
So this is one of those recipes that I have been carrying around in my back pocket for quite some time and last night I finally found time to bust these out. And in my opinion they just scream Easter-they are kind of pink hued and the coconut kind of makes them look like a nest. They are also super easy which is always nice for those crazy holidays in which we are all scrambling trying to put an impressive meal on the table for our families. So this recipe is full of shortcuts! Instead of making muffin batter it calls for Pillsbury biscuits in a can...not only do I get way too much enjoyment out of popping open the can, it also saves precious holiday minutes. It also uses frozen raspberries which makes this recipe accessible all year round and regardless of geography...yes believe it or not I can get off my self righteous I live in Southern California where the weather is always beautiful kick every once in awhile and think of the poor suckers who actually have to deal with snow in the winter (how is that for a train of thought run on sentence?)

This recipe is a Pillsbury recipe and they are called Raspberry Nut Dreams. And let me just say that description is pretty appropriate-the cream cheese makes them creamy, the raspberries give them a tart kick and the brown sugar and sweetened coconut give them just enough sugar to make them feel decadent. I do have to say they are best served warm so either serve them right out of the oven or throw them in the microwave for like 15 seconds prior to serving.

So throw the macadamia nuts in the food processor and coarsely chop them. Add the brown sugar and mix the ingredients. Set aside.
Also in the food processor combine the cream cheese, a small amount of the nut mixture and raspberry liquid. For some reason the raspberries I bought didn't provide me with any raspberry liquid so I added some raspberry jam and that worked just great. As you all know I am the queen of substitutions.
Quick funny story I was talking to a family member this week about my cheesecake I made last weekend. And he was telling me that his aunt was making cheesecake when he was a kid and ran out of graham crackers for the crust so she opted to use garlic bread crumbs. Seriously!! WTH!! As you know I love substitutions just as much of the next person, but seriously that is just WRONG!!! It is one thing to do that accidentally but to conscientiously pick garlic bread crumbs as a graham cracker substitute...eck!!
Take the Pillsbury biscuits and cut them horizontally so you have 16 biscuits. Place them in a greased muffin tin.

Add a 1/2 T of the cream cheese mixture, raspberries, 1T of the nut mixture and 1 tsp of coconut. Bake at 350 degrees for 14-22 minutes.
Here is the link to the actual recipe: http://www.pillsbury.com/recipes/raspberry-nut-dreams/7c0a338a-13ff-4746-9e15-dee88e75455b
Voila!! Instant Easter brunch treats!! These would be awesome with a cold mimosa...just sayin'. Cheers!!
Tuesday, March 19, 2013
Culinary School #2-Chicken
So today was a pretty big accomplishment for me. I truly languished in the false belief that all chickens already came boneless and skinless. However, those beliefs were quickly shattered when I realized I was going to have to cut apart a whole chicken for culinary school. I knew I had to face this fear and I knew it would be pretty frigging embarrassing if I vomited on the kitchen floor so I decided to put on my big girl panties and tackle my chicken.

Let me start by introducing you to my chicken...don't worry I did not name it because thanks to some very wise advice from friends I was told once it has a name you become attached. And ya know now that I think about it that is also wise dating advice...if you refer to them with a nickname to your friends....um yeah it is probably not a very serious relationship. I took this chicken butchering one step further and didn't even give it a nickname because I really wanted to keep my emotions out of this.

- To cut the breast cut around the cartilage of the breast bone, follow the knife around the wish bone and remove the breast and tenderloin.
- To cut the wings follow the fat lines
- To separate the leg and the thigh cut at the natural joint
The feedback I received was that I needed to cut closer to the bone and to take that disgusted look off my face. Both of those points were accurate and completely warranted. So my chicken might not have been the prettiest or the most perfect, but it definitely was cut with a lot of pride!
Last night was a night of firsts for me. Not only did I cut up a whole chicken and conquer that fear, I also ate the chicken I cut up. We made several chicken dishes and I don't know if I was relishing in the pride of cutting the chicken, it was super fresh or the recipes were just incredible, but all and all I have to say the chicken dishes were very tender, moist and full of flavor.
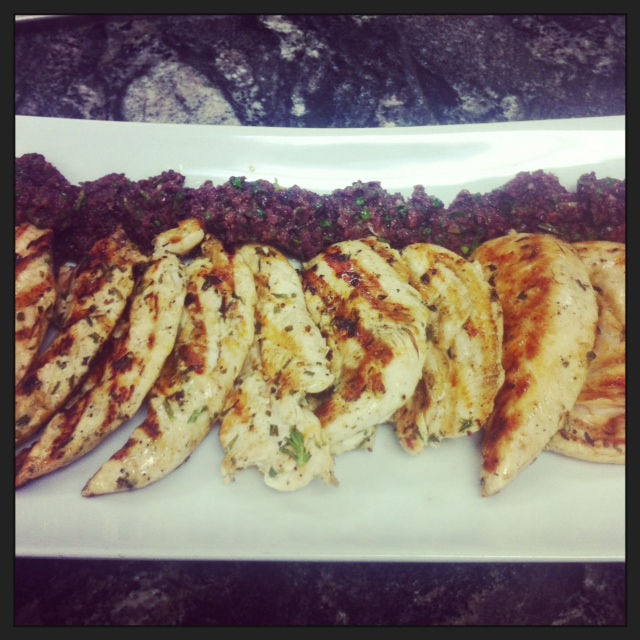 |
| Grilled Chicken with Tapenade |
Now for a few random culinary school tips that I wanted to share:
 |
| Braised Chicken w/Ancho Chili Tomatillo Sauce |
- When you add cream or wine to a sauce they should be at room temperature because you do not want to add cold to hot
- Do not put dough on a hot filling because the fat aka. butter will melt and leave holes in your dough...not so pretty
- If you add a 1/2 tsp of baking powder to pie crust it will make it lighter
- If you are using dried herbs instead of fresh herbs in a recipe use 1/3 the amount called for
 |
| Braised Chicken w/Pinot Noir & Crimini Mushrooms |
I also continued to practice my knife skills and here is my butchered zucchini:

Thanks for sharing in my joy and accomplishments! Cheers!
 |
| Agrodolce |
Monday, March 18, 2013
Field Trip: Eating My Way Through Ventura


The next stop was We Olive and this place was an eaters dream. You could taste everything and anything. I love olive oil to begin with, but this place had it all. I found some of the most incredible aged balsamic vinegar and blood orange olive oil, so of course it had to come home with me.


I had been hearing about Spice-topia for weeks. It is a spice lovers paradise! There is every spice known to man and they are even willing to blend spices for you if you are wanting a rub or tea blend or something just out of the ordinary. I definitely know where to go if I need an out of the ordinary spice and this beats having to mail order something, especially when you want to make it that night.


Monday, March 11, 2013
Culinary School #1-Salads
So I just got home from my first day of culinary school and let me just say I am jazzed! I love the group of people, I love the instructor and I love the teachers assistants. So the night started with a uniform fitting...yes I get my very own Chef coat with my name on it, some ugly chef pants and an even uglier chef hat...photos will be available as soon as this snazzy get up is in my hot little hands! Thanks Mom for the chef attire!

The first night was a salad class and we made three different types of salads. We made a traditional Caesar, a spinach, bacon, poppy seed salad with a poached egg (my favorite) and a Cajun chicken salad. I do have to let you all know right now that I did get permission to take photos and blog about my culinary school experience, but I also did promise not to share the recipes. So you are pretty much going to have to drool over the photos and/or bribe me to come over and cook for you. Just sayin'!!

We were placed in groups and my group was responsible for the Cajun chicken salad. Sure I am a little biased, but I seriously had an amazing group because my group came with a guy who made me coffee!! He is now my new best friend!! I also got to make the Caesar salad dressing and just a quick tip that I learned...via a mistake...do not use extra virgin olive oil in Caesar salad dressing as it changes the color...oopsie!! You want to use olive oil just not extra virgin because it is too yellow. Lesson learned!!
I can share some of my new found culinary school knowledge...so let me tell you what I learned. My cousin (thank you LP) taught me how to make poached eggs several Christmas's ago. But tonight I took my poached egg prowess to the next level. Here is what I learned about eggs:
- If you put the egg on a plate and the egg white spreads out and appears kind of watery it is an old egg. Old eggs don't poach well.

- Poached eggs should always be cooked in water that has vinegar and salt added to it... I knew about the vinegar but the salt is a new one for me
- You should stir the egg water in a circular motion like a whirlpool prior to adding the egg so it takes on a circular shape.

- If you want to make several poached eggs and serve them together cook them until they are done and then put them in an ice bath. When you are ready to serve them throw the eggs back in the hot water for 30-45 seconds to warm them up.
- If you are making a few eggs and want to serve them immediately take them out of the boiling water and put them in a warm water bath to keep them warm.
Pretty cool tips, ay!! And here is my poached egg!! Yes, I am very proud!!

I also have to tell you that I learned that my knife skills do officially suck. Although I did come home with all 10 fingers it was close to being a miracle. Thank you to one specific teachers assistant who held my hand while I cut green onions and who had a scared look on his face every time I came in contact with a knife. Oh poor guy hasn't seen anything yet!! HAHA (yes, that is an evil laugh). Next week is the chicken class and I truly believe that all chickens come boneless and skinless so I am pretty much screwed!!!
Happy Monday and Happy Cooking!! Cheers!!
Sunday, March 3, 2013
There Is Just Something About Pizza....
Last night I invited myself to my friends house, however it did come with two stipulations. I wanted to bring her brother with me and I wanted to cook. I know you are probably thinking, damn this girl is a little bit pushy, but never fear I have a few friends in which there are just no boundaries. And she is one of them.
I had plans to hang out with her brother, but I wanted to see her and so I thought it was a win/win. I also was doing some wine research for an article I was writing and I thought if I offered to cook I would get some article research and a blog out of the experience. Plus as you all know my happy place is in the kitchen and I love to be in other people's kitchens....so seriously everyone was happy.

I decided to make pizzas after reading an article in Cooking Light. However, although I bought some of the ingredients from the recipes we pretty much decided to do our own thing. And we had so much fun!! The pizzas were all truly a collaboration and it was just such an incredible experience to be in the kitchen with people you care about. The kitchen was filled with laughter, stories and just catching up...wine glass in hand.
The experience was filled with analysis, tasting research and negotiation. I was teased about the fact that I tasted everything. And although I could have easily brushed it off as quality control, the truth of the matter is I just love to snack while I cook.
I seriously think there is just something about pizza that brings people together. It is a festive food, it is warm and cozy and it is one of the easiest ways to accommodate all needs.
The first pizza we made had a marinara sauce. It also had ricotta cheese, grilled eggplant, mozzarella and fresh basil. The eggplant was not my idea, but it was amazing!! It was grilled on a grill pan with a little oil, salt and pepper and maybe a secret seasoning. It was cut very thin and it was already cooked when it went on the pizza so there wasn't any added liquid to make the pizza soggy. The other key to this pizza was adding the basil for the last 2 minutes of cooking time. It was delicious!


And for dessert there was homemade baklava, which was incredible!!
The entire meal was truly made with love and it showed. It was a beautiful night in Southern California...in March...and we ate outside around a fire pit, under the stars. This was a night with amazing memories, lots of laughs, good friends, good wine and good food. Cheers!!

“Cooking is not about being the best or most perfect cook, but rather it is about sharing the table with family and friends.”
~ Skye Gyngell, My Favorite Ingredients
Friday, March 1, 2013
I Love To Bake!! Now!
Several years ago I saw baking as a chore. There was one Christmas where I was bound and determined to make homemade desserts and what started as an act of love turned into Chefzilla...similar to Bridezilla but with a baking component. It involved a pumpkin cheesecake that fell in the middle and ended up looking more like a sink pit designed for Aztec torture. It also involved a chocolate cake that almost caught the house on fire and ended up charred on the outside and under done on the inside. And thankfully the third dessert turned out, otherwise I think that one would have been thrown at the wall.

Since that point I have had countless other baking experiments and a New Years resolution a few years back that involved learning how to bake. And now all though I am not thrilled with everything I bake I have learned to love it. Believe it or not it has actually become my after work stress release. I now find a lot of pleasure in pouring myself a glass of wine, turning on some jazz and baking. There is something therapeutic in losing yourself to the recipe, one that requires concentration on measurements, trying new ingredients and the joy of smelling something sweet and luscious baking in the oven.
So the other night I made Earl Grey Lemon Bars from Cooking Light. Don't get me wrong I love chocolate just like the next person, but I wanted something that kind of screamed Spring and that was a little different. I have also been on a kick lately where I have really enjoyed cooking with tea. I love the earthy flavors of the tea and in this recipe it added a nice contrast to the tartness of the lemon. And yes I know it is March, but I live in So Cal and therefore it is not too early to start celebrating Spring. I totally just rush through Winter as if it doesn't exist...that is just how I roll.
Anyway back to the lemon bars. This recipe was wonderful! The shortbread crust has a hint of Earl Grey which gives it a nice spice that contrasts with the buttery flavor. Sure it could have been improved with a little more butter but that would have diminished the whole Cooking Light element. The filling also had the classic lemon mixture, but it had some tea in it as well which really changed the flavor profile. And I loved the texture of the filling it was a cross between a lemon curd and a pudding and it was awesome!! It also baked perfectly so it had that crunchy exterior and that creamy interior. Perfection!!!
This recipe was also very easy. It did call for a metal baking pan which I didn't have so I used glass and it worked fine. However, I did google why recipes call for metal instead of glass and it has to do with browning. Metal pans brown the baked goods better than glass. So there is your random fact for the day.
 The crust involves adding flour, powdered sugar, the insides of a tea bag and salt. If you haven't torn apart a tea bag it is super easy. I just cut a whole in it and poured the tea into a measuring spoon. It was actually pretty fun because I felt a little destructive and rebellious...it is the little things in life, right?
Next cut in the butter using either a pastry blender or two knives. I have tried both techniques and they both work equally as well. Once the mixture looks like course meal put it into the pan and press it into the bottom. On a side note I love any recipe that allows me to use my hands so I had a great time with the crust!! Think it just reminds me of making mud pies in the back yard as a kid or playing with play dough! Win/Win!!

Bake the crust for 19 minutes in a 350 degree oven.

Juice the lemons and microwave for 30 seconds. Add a bag of tea and let it sit for 10 minutes. Combine the sugar, flour and baking powder in a separate bowl. Once the juice has sat, squeeze the tea out of the bag into the lemon juice. Add the lemon zest to the juice. And on another side note if you don't own a lemon zester-buy one!! Single best kitchen purchase I have ever made!! Add the eggs to the juice mixture and then mix into the sugar.
Pull the crust out of the oven and add the lemon mixture. Bake for 23 minutes.

Yes, this recipe has very odd baking times. But it totally works so I say stick with it!!
Once the bars have cooled sprinkle powder sugar over them and enjoy!!
 Crust:
Cooking spray
5.6 ounces all-purpose flour (about 1 1/4 cups)
1/3 cup powdered sugar
2 Earl Grey tea bags, divided
1/8 teaspoon salt
8 tablespoons chilled butter, cut into pieces
Filling:
1/4 cup fresh lemon juice
1 cup granulated sugar
2 tablespoons all-purpose flour
1/2 teaspoon baking powder
2 teaspoons grated lemon rind
3 large eggs
1 tablespoon powdered sugar
Preparation
1. Preheat oven to 350°.
2. To prepare crust, line an 8-inch square metal baking pan with foil that extends 2 inches beyond sides; coat foil with cooking spray. Weigh or lightly spoon 5.6 ounces flour into dry measuring cups; level with a knife. Combine 5.6 ounces flour, 1/3 cup powdered sugar, 1 teaspoon tea leaves from 1 tea bag (discard remaining tea in bag), and salt in a bowl; cut in butter with a pastry blender or two knives until mixture resembles coarse meal. Press into bottom of prepared pan. Bake at 350° for 19 minutes or until lightly browned.
3. To prepare filling, place juice in a medium microwave-safe bowl. Microwave at HIGH for 30 seconds. Add remaining 1 tea bag to juice; cover and steep 10 minutes. Squeeze juice from tea bag into bowl; discard tea bag. Combine granulated sugar, 2 tablespoons flour, and baking powder in a bowl. Add rind and eggs to juice; stir with a whisk until combined. Add sugar mixture to juice mixture; stir with a whisk until well combined.
4. Remove crust from oven; pour filling onto hot crust. Bake at 350° for 23 minutes or until set. Cool in pan on a wire rack for 30 minutes. Remove from pan by lifting foil. Remove foil; cut into 16 bars. Sprinkle bars with 1 tablespoon powdered sugar.

Happy First Day of March!! I truly can't believe how quickly this year has just gone by!! Enjoy this recipe and enjoy every moment that you get to spend in the kitchen! Cheers!

Since that point I have had countless other baking experiments and a New Years resolution a few years back that involved learning how to bake. And now all though I am not thrilled with everything I bake I have learned to love it. Believe it or not it has actually become my after work stress release. I now find a lot of pleasure in pouring myself a glass of wine, turning on some jazz and baking. There is something therapeutic in losing yourself to the recipe, one that requires concentration on measurements, trying new ingredients and the joy of smelling something sweet and luscious baking in the oven.
So the other night I made Earl Grey Lemon Bars from Cooking Light. Don't get me wrong I love chocolate just like the next person, but I wanted something that kind of screamed Spring and that was a little different. I have also been on a kick lately where I have really enjoyed cooking with tea. I love the earthy flavors of the tea and in this recipe it added a nice contrast to the tartness of the lemon. And yes I know it is March, but I live in So Cal and therefore it is not too early to start celebrating Spring. I totally just rush through Winter as if it doesn't exist...that is just how I roll.
Anyway back to the lemon bars. This recipe was wonderful! The shortbread crust has a hint of Earl Grey which gives it a nice spice that contrasts with the buttery flavor. Sure it could have been improved with a little more butter but that would have diminished the whole Cooking Light element. The filling also had the classic lemon mixture, but it had some tea in it as well which really changed the flavor profile. And I loved the texture of the filling it was a cross between a lemon curd and a pudding and it was awesome!! It also baked perfectly so it had that crunchy exterior and that creamy interior. Perfection!!!
This recipe was also very easy. It did call for a metal baking pan which I didn't have so I used glass and it worked fine. However, I did google why recipes call for metal instead of glass and it has to do with browning. Metal pans brown the baked goods better than glass. So there is your random fact for the day.

Next cut in the butter using either a pastry blender or two knives. I have tried both techniques and they both work equally as well. Once the mixture looks like course meal put it into the pan and press it into the bottom. On a side note I love any recipe that allows me to use my hands so I had a great time with the crust!! Think it just reminds me of making mud pies in the back yard as a kid or playing with play dough! Win/Win!!

Bake the crust for 19 minutes in a 350 degree oven.

Juice the lemons and microwave for 30 seconds. Add a bag of tea and let it sit for 10 minutes. Combine the sugar, flour and baking powder in a separate bowl. Once the juice has sat, squeeze the tea out of the bag into the lemon juice. Add the lemon zest to the juice. And on another side note if you don't own a lemon zester-buy one!! Single best kitchen purchase I have ever made!! Add the eggs to the juice mixture and then mix into the sugar.
Pull the crust out of the oven and add the lemon mixture. Bake for 23 minutes.

Yes, this recipe has very odd baking times. But it totally works so I say stick with it!!
Once the bars have cooled sprinkle powder sugar over them and enjoy!!

Cooking spray
5.6 ounces all-purpose flour (about 1 1/4 cups)
1/3 cup powdered sugar
2 Earl Grey tea bags, divided
1/8 teaspoon salt
8 tablespoons chilled butter, cut into pieces
Filling:
1/4 cup fresh lemon juice
1 cup granulated sugar
2 tablespoons all-purpose flour
1/2 teaspoon baking powder
2 teaspoons grated lemon rind
3 large eggs
1 tablespoon powdered sugar
Preparation
1. Preheat oven to 350°.
2. To prepare crust, line an 8-inch square metal baking pan with foil that extends 2 inches beyond sides; coat foil with cooking spray. Weigh or lightly spoon 5.6 ounces flour into dry measuring cups; level with a knife. Combine 5.6 ounces flour, 1/3 cup powdered sugar, 1 teaspoon tea leaves from 1 tea bag (discard remaining tea in bag), and salt in a bowl; cut in butter with a pastry blender or two knives until mixture resembles coarse meal. Press into bottom of prepared pan. Bake at 350° for 19 minutes or until lightly browned.
3. To prepare filling, place juice in a medium microwave-safe bowl. Microwave at HIGH for 30 seconds. Add remaining 1 tea bag to juice; cover and steep 10 minutes. Squeeze juice from tea bag into bowl; discard tea bag. Combine granulated sugar, 2 tablespoons flour, and baking powder in a bowl. Add rind and eggs to juice; stir with a whisk until combined. Add sugar mixture to juice mixture; stir with a whisk until well combined.
4. Remove crust from oven; pour filling onto hot crust. Bake at 350° for 23 minutes or until set. Cool in pan on a wire rack for 30 minutes. Remove from pan by lifting foil. Remove foil; cut into 16 bars. Sprinkle bars with 1 tablespoon powdered sugar.

Happy First Day of March!! I truly can't believe how quickly this year has just gone by!! Enjoy this recipe and enjoy every moment that you get to spend in the kitchen! Cheers!
Subscribe to:
Posts
(Atom)
Visit My Website!


