Saturday, January 30, 2016
Scrambled Egg Brunch Braid
If I could pick a favorite meal it would be brunch. Don't get me wrong I love them all. But brunch just about has the best of all of the meal worlds. It includes breakfast food, which can include bacon, so you can't go wrong there. It includes happy hour, aka cocktails, so that is a win. You can also throw in non-breakfast food, so technically you can eat lunch or dinner food, even though it is in the morning. Voila absolute meal perfection!

Plus it is the perfect time of day, it is not too early and not too late. Normally it is a lazy meal, and by lazy I mean that you usually linger over it with good company. And for some reason there is just something about brunch, that regardless of the day, reason or experience it just feels festive....maybe it is the whole champagne and/or bloody mary thing...which is an instant party!!! Woot woot!!
So a few weeks ago I decided to make brunch. One of my co-workers was coming over to catch up and I thought it would be the perfect excuse to drink mimosas, have some girl time and try to make a breakfast braid.
Let me start by saying I am not usually so handy with anything that requires shaping, so I was a little concerned about this whole braiding bread thing, but I figured what do I have to lose? And worse case scenario we could eat the scrambled egg stuffing and give up on the bread part. However, I was actually pretty pleased with myself...ok sure my breakfast braid looked a little bit like a mummy...but overall I was happy. And yeah I may just wait to make this again until it is Halloween and then I can claim to have done this on purpose and call it a "Scrambled Egg Brunch Mummy," which would make it a win/win.
This recipe starts with a cheat, which on a side note, I love cooking cheats!! Instead of making homemade dough you can use crescent rolls. Seriously who wants to make dough first thing in the morning? Lets see I can either be lazy on the couch and drink coffee before I entertain or I can make dough....the answer is obvious...coffee!!
Unroll the crescent rolls. You will need two cans of them. Press the perforations together, creating a giant rectangle.

Sprinkle the chopped ham down the center of the dough.
In a bowl, whisk together the softened cream cheese, milk, eggs, salt and pepper. Add the chopped bell pepper and green onions.

Cook the egg mixture, scrambling until set. Sorry this is the part that didn't get photographed because I got distracted with the friend arriving and the mimosas. I am a pretty good cook, photographer and blogger until my a.d.d sets in at which point the details start slipping through the cracks....shiny objects!!
Spread the scrambled eggs over the ham and sprinkle with cheese.
Next cut horizontal slits in the dough, on the long side of the rectangle. Fold in the strips, over the filling, alternating strips, to form your braid aka. mummy. Pinch the dough at the short ends to seal in the filling. Beat an egg white and brush over the dough.

Bake in a 375 degree oven for 25-28 minutes.

Here is the actual recipe:
2 (8 ounce) cans refrigerated crescent rolls
4 ounces thinly sliced deli ham, chopped
4 ounces cream cheese, softened
1/2 cup milk
1 egg, separated
7 eggs
1/4 teaspoon salt
ground black pepper to taste
1/4 cup chopped red bell pepper
2 tablespoons chopped green onion
1 teaspoon butter
1/2 cup shredded Cheddar cheese
Preheat oven to 375 degrees F (190 degrees C).
Lightly grease a baking sheet.
Unroll each tube of crescent dough, but do not separate rectangles. Place side-by-side on prepared baking sheet with long sides touching; press and seal seams and perforations.
Arrange ham lengthwise down center third of rectangle.
Beat cream cheese and milk in a bowl. Separate one egg, placing egg white aside. Stir egg yolk, remaining eggs, salt, and pepper into cream cheese mixture; fold in red pepper and onion.
Melt butter in a large skillet over medium heat; pour egg mixture into skillet and cook until just set, about 5 minutes. Remove from heat and spoon eggs over ham; sprinkle with Cheddar cheese.
Cut 1-inch-wide strips towards the center to within 1/2-inch of filling on each long side of dough. Starting at one end, fold alternating strips at an angle across filling; pinch ends to seal and tuck under.
Beat reserved egg white and brush over dough.
Bake in preheated oven until golden, 25 to 28 minutes.
I honestly loved this recipe!! It is pretty and who doesn't love pretty food, especially when it is paired with a champagne cocktail!! It is tasty, who can go wrong with ham, eggs, cheese and bread? And it is festive!! It is the perfect recipe for entertaining! And honestly it was pretty easy....truly I was scared of the braiding part for no reason...it was really easy. I am sure if I hadn't been drinking and talking and braiding the quality of the braid would have been better, but even throwing in those distractors, overall I was still happy with the appearance! Have an amazing Saturday and cheers!!
Sunday, January 24, 2016
The Vista Ranch and Cellars-Merced, CA
When I was initially told I was going to Merced for 2 weeks I had a brief moment of panic, what am I going to do in Merced for 2 weeks? My panic became straight up anxiety when on the first day of teaching in Merced they asked me if I was carrying a taser. Really? Do I look like I carry a taser? They also told me not to run outside. Oh help me God I am in a place that is unsafe to run outside. However, I was bound and determined to find the slice of heaven in Merced, and I found it.

The Vista Ranch and Cellars is on the East State Highway 140, surrounded by orchards and well orchards. It is on a 2 lane highway with the railroad tracks running adjacent and you feel like you are driving to nowhere until you see the sign that says wine tasting.

I obviously went in the dead of winter and so it was getting dark as I pulled into the parking lot, however it had the cutest picnic area with lights and beautiful trees. It would be the perfect summer evening picnic spot. The tasting room itself is housed in an old farm house until you walk inside and it has a modern bar and it is light, bright and inviting. I felt like I had come home as soon as I walked in.

I talked 2 of my co-workers into going on this adventure with me, which wasn't too hard to do since we were all in Merced and they didn't have better offers. So the three of us sat down at the bar and decided to do some wine tasting. The winery has a full menu of wines to choose from-3 whites, 4 reds, a dessert wine and a sparkling wine. They allow you to pick 5 wines of your choosing and I always love wineries that allow me to make choices.

I started with the Chardonnay, which did not taste like a typical Chard. It was light with a hint of citrus and just a subtle sweetness. It was refreshing and would be a really nice wine paired with food.
I moved on to their reds and I tasted their Cab, which although it was good was a little dry for my taste. I also tasted their red blend and their Zinfandel, which were both easy to drink. I also tried their sparkling wine which was actually one of my favorites, it had the perfect balance between being dry and sweet. It could easily be sipped alone or turned into a champagne cocktail. On a side note, I also have to say I loved their labels, especially the ones that had art featuring Yosemite National Park. The Zinfandel and the sparkling wine came home with me. Don't judge I carry bubble wrap in my suitcase so I can bring wine home!

I also love tasting rooms that have things for me to look at and of course purchase, ya know the whole wine tasting a.d.d thing and this tasting room did not disappoint. It had a wonderful mix of picnic foods, local products and artwork. I bought some local handmade jam which is too die for!! However, you can easily show up here and buy cheese, meats and wine and take them outside for your picnic and truly be set for an evening.
Now I don't usually go wine tasting for the food, however we were all starving since we had just got off work and they had Portuguese style chili and panninis so we decided we needed to eat. Let me just say if you are there and they have the Portuguese style chili, order it! It was awesome! It had big chunks of sausage in it and it had the perfect amount of spice. It was amazing comfort food!! The winery has a chef who makes the menu and everyday he features a soup, everything from clam chowder to potato leek soup to chili. If you really want the chili, we learned that Thursdays are chili nights, just my food tip!

I also need to give a shout out to the staff! We completely lost track of time and the tasting room closes at 6, however they stayed open for us and continued to let us drink wine (yes we ordered glasses), eat chili and enjoy each others company. We did not feel pressured to leave and they never even brought the time to our attention which was so appreciated.

This place is definitely a hidden gem and it is worth checking out.
Here is the web page: http://vistacellars.com
Cheers!!
Saturday, January 16, 2016
Gingerbread Biscotti
For the longest time I have wanted to try and make biscotti, but I had a fear of shaping it. Seriously? How the hell do they shape it to look like a squished crescent moon? And the uniformity of each one? I thought for sure I would be doomed and my biscotti would look like poop (pun intended). However, since 2016 is the year that I face my fears I decided I might as well start the year off right and conquer a big kitchen fear-biscotti!!

Therefore, I promptly invited myself over to a friends house to destroy her kitchen while we attempted to make Gingerbread Biscotti! The kitchen adventure began with one of my besties making me lunch and bribing me with some liquid courage aka. wine, which always helps in overcoming any kitchen fear, by the way. As a side note she made these crock pot gyros and they are too die for!! Here is the recipe: http://www.thecomfortofcooking.com/2015/03/slow-cooker-chicken-gyros-with-tzatziki-sauce.html
After a few glasses of wine we were ready to get in the kitchen. Start by mixing the oil, sugar, eggs and molasses together. This recipe asks for unsulphered molasses and my understanding is that this type of molasses is a higher quality and gives it a more defined sugarcane flavor. It tasted great in the biscotti so don't be afraid of it.

Next combine the dry ingredients. This recipe calls for a combination of whole wheat and all purpose flour, and it does give the cookies a nice nutty flavor and does not impact the consistency, which whole wheat flour can sometimes do. The dry ingredients include both types of flour, baking powder, ground ginger, cinnamon, ground cloves, nutmeg and salt.

Finally, mix the dry ingredients into the sugar mixture.

Once the dough is made, the day of reckoning begins....shaping the biscotti!! Yes, I am being dramatic! It was actually way easier than I expected. Put the dough on a parchment lined cookie sheet and shape into logs, two of them. They should be about 1/2 inch thick and kind of flat on the top.


Bake for approximately 20 minutes. Cool for 10 minutes and then cut diagonally into 1/2 inch thick slices.

Put biscotti slices back on the baking sheet and bake for 5-7 minutes on each side.


Cool completely and if you are interested in taking these biscotti to the next level drizzle with melted white chocolate, which enhances their aesthetic appeal!

Here is the actual recipe:
Ingredients
1/3 cup vegetable oil
1 cup white sugar
3 eggs
1/4 cup molasses
2 1/4 cups all-purpose flour
1 cup whole wheat flour
1 tablespoon baking powder
1 1/2 tablespoons ground ginger
2 1/4 teaspoons ground cinnamon
1/2 teaspoon ground cloves
1/4 teaspoon ground nutmeg
Directions
Preheat the oven to 375 degrees F (190 degrees C). Grease a cookie sheet.
In a large bowl, mix together oil, sugar, eggs, and molasses.
In another bowl, combine flours, baking powder, ginger, cinnamon, cloves, and nutmeg; mix into egg mixture to form a stiff dough.
Divide dough in half, and shape each half into a roll the length of the cookie. Place rolls on cookie sheet, and pat down to flatten the dough to 1/2 inch thickness.
Bake in preheated oven for 25 minutes. Remove from oven, and set aside to cool.
When cool enough to touch, cut into 1/2 inch thick diagonal slices. Place sliced biscotti on cookie sheet, and bake an additional 5 to 7 minutes on each side, or until toasted and crispy.
They were actually so much easier than I expected and they looked and tasted great. The gingerbread flavor was a nice addition to biscotti and we had them with cinnamon tea as we watched Married at First Sight, my new guilty pleasure...don't judge!! Cheers!!
Friday, January 1, 2016
Food and Wines Lessons Learned from Travel and Overnight Mushroom Asparagus Strata
Happy New Year! I can hardly believe it is 2016!! This past year has been a crazy roller coaster of change for me and although I haven't been writing as consistently as I would have liked, this blog has continued to be one of my constants...and for that I am thankful.
In reflecting back over the previous 365 days I realized I have learned some invaluable lessons and I thought I would take a few minutes to share them with you. I took a new job this year which has me traveling constantly and my travels have taught me quite a bit about food and wine. Here are some of my life lessons:
1. The internet does not tell you when they are sending you to a banana pudding place in the ghetto. There isn't banana pudding on the planet worth risking your life for.
2. A crack house in Georgia refers to an establishment that cracks nuts, not a location to score cocaine.
3. Sticking your finger in a dead squid to clean it is straight up disgusting.
4. Everyone claims to have the "best BBQ," however it is very subjective and anyone can have a sign made.
5. California truly makes the best wine...Sorry Georgia, Delaware, Virginia, Louisiana and Washington. And you would be surprised by how many states sell wine "native" to their state, but source their grapes from Cali. Just saying!
6. You can really buy canned creamed possum in Virginia...this shit is no joke and I couldn't bring myself to try it.
7. Every state has a meat product that "tastes like chicken," but its not.
8. No matter where you are when you eat at a restaurant near a body of water the food just tastes better.
9. If an establishment has bars on the windows you should probably not stop the car, go inside or talk to the gang members standing outside.
10. Regardless of what state you are in, when you do shots, it leads to trouble.....always!

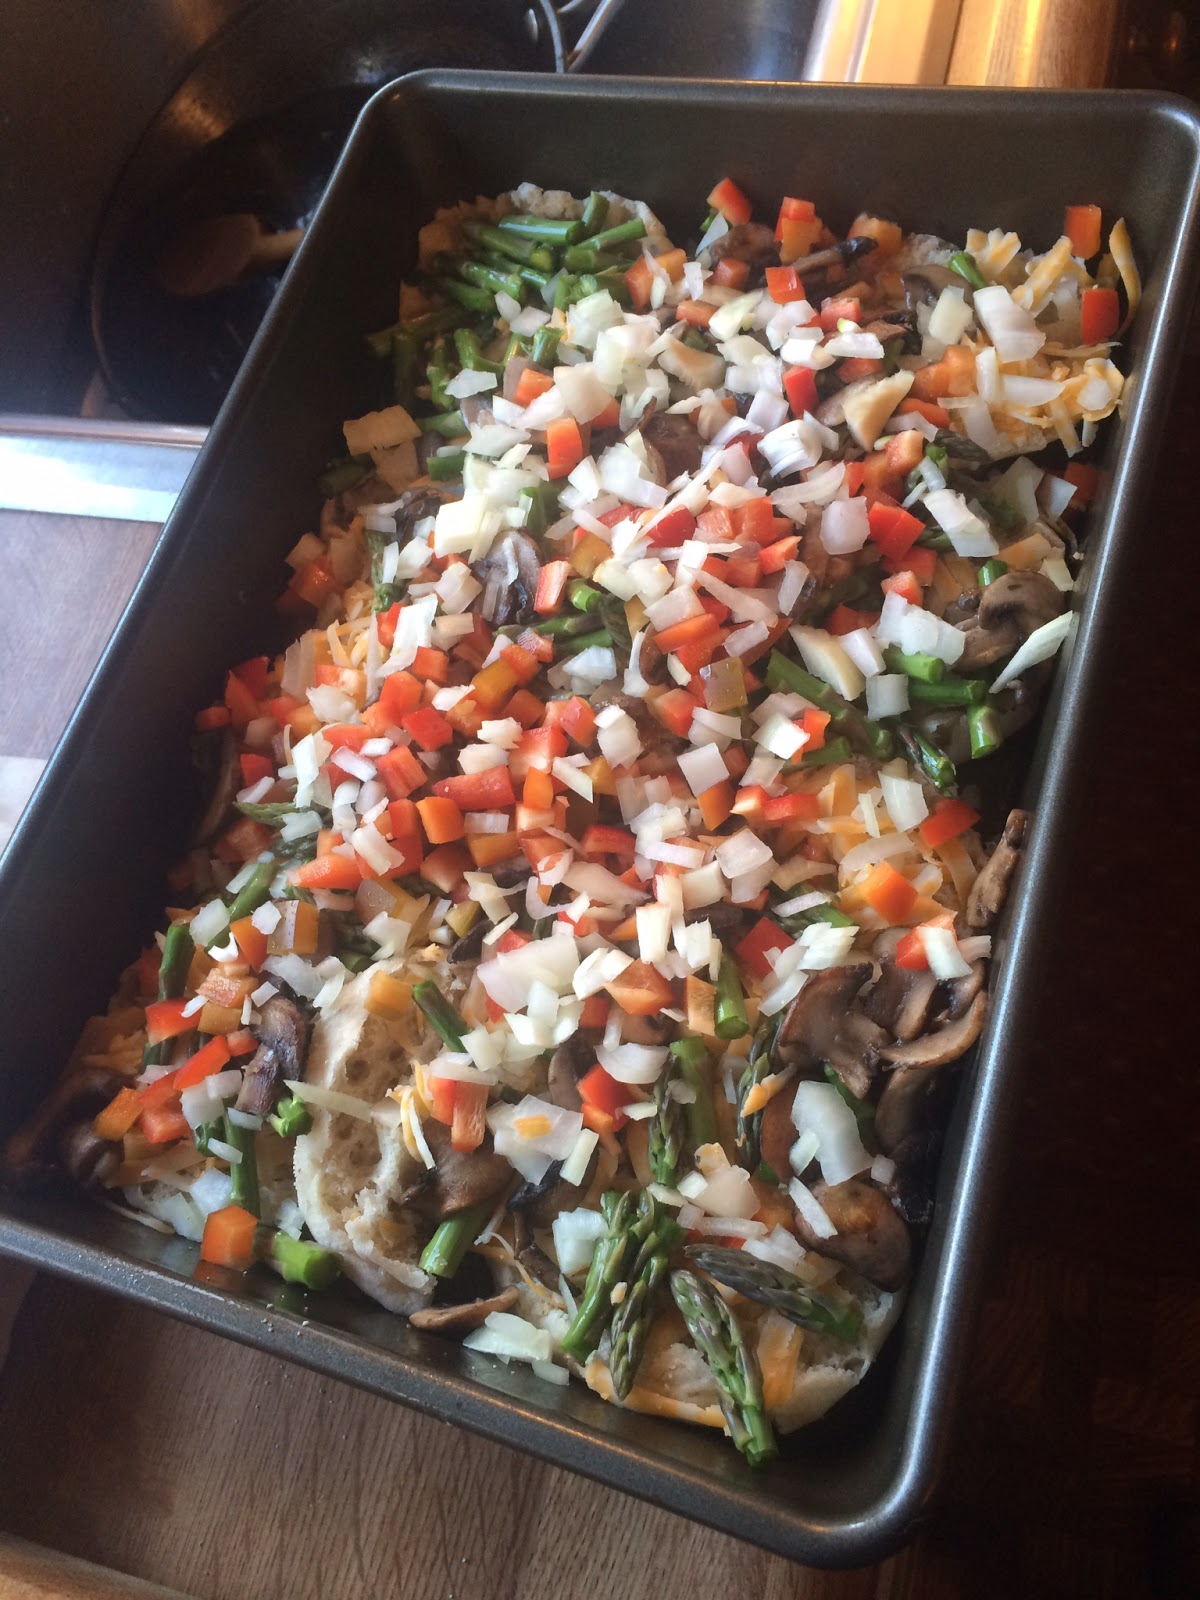
Now if you are looking for the worlds easiest brunch recipe let me help you out. This recipe can be made the night before, stored in the fridge and baked in the morning. It is perfect for entertaining and it is low maintenance and so tasty!! I made this for Christmas morning and it was so decadent to wake up on a holiday morning, drink coffee, bake breakfast and nurse your hangover without feeling like you have to be in a frenzy to pull off a brunch for 8.
Here is the recipe:
Ingredients:
2 teaspoons butter, or as needed
1 3/4 cups sliced crimini mushrooms
5 English muffins, split and toasted
1 cup shredded Colby-Monterey Jack cheese
1 pound fresh asparagus, trimmed and cut into 1-inch pieces
1/2 cup chopped red bell pepper
1/2 onion, finely chopped
8 eggs
2 cups milk
1 teaspoon salt
1 teaspoon dry mustard powder
1/4 teaspoon ground black pepper
1 cup shredded Colby-Monterey Jack cheese
Directions:

Melt the butter in a skillet over medium heat, and cook and stir the mushrooms until their liquid has mostly evaporated and the mushrooms are beginning to brown, about 10 minutes. Set the mushrooms aside.

Grease a 9x13 inch baking dish, and arrange 8 muffin halves, cut sides up, in the bottom of the dish. Stuff pieces of remaining muffins into the spaces between the halves.
Spread 1 cup of Colby-Monterey Jack cheese over the muffins in a layer, and distribute the asparagus pieces, mushrooms, red pepper, and onion over the cheese.

Whisk together eggs, milk, salt, dry mustard, and black pepper in a bowl, and pour the egg mixture over the muffins and vegetables.
 Cover the dish, and refrigerate overnight.
The next day, preheat oven to 375 degrees F (190 degrees C).
Remove the casserole from the refrigerator and let stand for 30 minutes. Spread 1 cup of Colby-Monterey Jack cheese in a layer over the casserole.
Bake in the preheated oven until a knife inserted near the edge comes out clean, 40 to 45 minutes. Let stand 5 to 10 minutes before cutting into squares.

I hope you all have an incredible 2016 and I wish you lots of love, happiness and blessings. Cheers!
In reflecting back over the previous 365 days I realized I have learned some invaluable lessons and I thought I would take a few minutes to share them with you. I took a new job this year which has me traveling constantly and my travels have taught me quite a bit about food and wine. Here are some of my life lessons:
1. The internet does not tell you when they are sending you to a banana pudding place in the ghetto. There isn't banana pudding on the planet worth risking your life for.
2. A crack house in Georgia refers to an establishment that cracks nuts, not a location to score cocaine.
3. Sticking your finger in a dead squid to clean it is straight up disgusting.
4. Everyone claims to have the "best BBQ," however it is very subjective and anyone can have a sign made.
5. California truly makes the best wine...Sorry Georgia, Delaware, Virginia, Louisiana and Washington. And you would be surprised by how many states sell wine "native" to their state, but source their grapes from Cali. Just saying!
6. You can really buy canned creamed possum in Virginia...this shit is no joke and I couldn't bring myself to try it.
7. Every state has a meat product that "tastes like chicken," but its not.
8. No matter where you are when you eat at a restaurant near a body of water the food just tastes better.
9. If an establishment has bars on the windows you should probably not stop the car, go inside or talk to the gang members standing outside.
10. Regardless of what state you are in, when you do shots, it leads to trouble.....always!

Now if you are looking for the worlds easiest brunch recipe let me help you out. This recipe can be made the night before, stored in the fridge and baked in the morning. It is perfect for entertaining and it is low maintenance and so tasty!! I made this for Christmas morning and it was so decadent to wake up on a holiday morning, drink coffee, bake breakfast and nurse your hangover without feeling like you have to be in a frenzy to pull off a brunch for 8.
Here is the recipe:
Ingredients:
2 teaspoons butter, or as needed
1 3/4 cups sliced crimini mushrooms
5 English muffins, split and toasted
1 cup shredded Colby-Monterey Jack cheese
1 pound fresh asparagus, trimmed and cut into 1-inch pieces
1/2 cup chopped red bell pepper
1/2 onion, finely chopped
8 eggs
2 cups milk
1 teaspoon salt
1 teaspoon dry mustard powder
1/4 teaspoon ground black pepper
1 cup shredded Colby-Monterey Jack cheese
Directions:

Melt the butter in a skillet over medium heat, and cook and stir the mushrooms until their liquid has mostly evaporated and the mushrooms are beginning to brown, about 10 minutes. Set the mushrooms aside.

Grease a 9x13 inch baking dish, and arrange 8 muffin halves, cut sides up, in the bottom of the dish. Stuff pieces of remaining muffins into the spaces between the halves.
Spread 1 cup of Colby-Monterey Jack cheese over the muffins in a layer, and distribute the asparagus pieces, mushrooms, red pepper, and onion over the cheese.
Whisk together eggs, milk, salt, dry mustard, and black pepper in a bowl, and pour the egg mixture over the muffins and vegetables.

The next day, preheat oven to 375 degrees F (190 degrees C).
Remove the casserole from the refrigerator and let stand for 30 minutes. Spread 1 cup of Colby-Monterey Jack cheese in a layer over the casserole.
Bake in the preheated oven until a knife inserted near the edge comes out clean, 40 to 45 minutes. Let stand 5 to 10 minutes before cutting into squares.

I hope you all have an incredible 2016 and I wish you lots of love, happiness and blessings. Cheers!
Subscribe to:
Posts
(Atom)
Visit My Website!


