Monday, September 30, 2013
Salsa, Black Bean & Rice Salad...And Confessions of a Candy Crush Addict
Can we talk briefly about a random subject before we talk about food? Candy Crush! I do not play games and I don't normally get addicted to things like that...I played Words with Friends for like 4 1/2 seconds, Farmville never caught my attention...but Candy Crush...it has taken over my entire world!! The whole countdown to life thing is the biggest anticipation tease I have ever experienced! The whole trying to advance to the next level by playing the same game 47 times in a row...killer. The whole fun music, colorful graphics and making you feel like you are a 6 year old again...out of friggin control! It is becoming harder and harder to find time to blog due to this Candy Crush addiction...forget AA I need some type of 12 step program from Candy Crush!!

Anyway back to food and wine. I am always looking for creative food to bring for lunch. I am not a huge fan of leftovers and so only certain things sound good the next day. Plus I really can't eat the same food for several days in a row, that is almost like a cardinal sin to me. So hence the creativity, needing to mix it up, need to cook to get away from Candy Crush...yes, see it all comes full circle.
So Saturday night I made a Salsa, Black Bean and Rice Salad. I had to run 8 miles on Sunday so I thought this would be a good carb dinner and it made 6 servings so I had visions of weekday leftovers. Let me start by saying I used Frontera salsa, which is Rick Bayless's new label and I loved the salsa! It was spicy, smokey and had chipotle peppers in it so that roasted flavor was incredible!

This is also a great recipe if you have leftover rice, which I often do, as it calls for cooked and chilled rice. I also loved the collaboration of southwest flavors between the pepper jack cheese, salsa, cilantro and black beans. The fresh veggies-green onions, tomatoes, peppers and corn are a really nice addition. And the sour cream and lettuce helps to cut the spice!
The only feedback that I have that is even remotely negative is the fact that as the salad sits it does get a little dry. But I just added a little extra salsa the next day and it went back to being perfect. In general, this salad would be great as a side dish for tacos, enchiladas, etc or you can just eat it as a salad like I did and take it for leftover lunches.

It is also extremely easy, just combine the rice, beans, tomato, pepper, corn, onion, cilantro and salsa. Add in the cheese cubes and serve on a bowl lined with lettuce and topped with sour cream...seriously doesn't get much easier than that, right!!
And ya know what else I have found? If you make easy, fast meals that leads to more time playing Candy Crush...I so just need to delete that app. Cheers my friends!

Anyway back to food and wine. I am always looking for creative food to bring for lunch. I am not a huge fan of leftovers and so only certain things sound good the next day. Plus I really can't eat the same food for several days in a row, that is almost like a cardinal sin to me. So hence the creativity, needing to mix it up, need to cook to get away from Candy Crush...yes, see it all comes full circle.
So Saturday night I made a Salsa, Black Bean and Rice Salad. I had to run 8 miles on Sunday so I thought this would be a good carb dinner and it made 6 servings so I had visions of weekday leftovers. Let me start by saying I used Frontera salsa, which is Rick Bayless's new label and I loved the salsa! It was spicy, smokey and had chipotle peppers in it so that roasted flavor was incredible!

This is also a great recipe if you have leftover rice, which I often do, as it calls for cooked and chilled rice. I also loved the collaboration of southwest flavors between the pepper jack cheese, salsa, cilantro and black beans. The fresh veggies-green onions, tomatoes, peppers and corn are a really nice addition. And the sour cream and lettuce helps to cut the spice!
The only feedback that I have that is even remotely negative is the fact that as the salad sits it does get a little dry. But I just added a little extra salsa the next day and it went back to being perfect. In general, this salad would be great as a side dish for tacos, enchiladas, etc or you can just eat it as a salad like I did and take it for leftover lunches.

It is also extremely easy, just combine the rice, beans, tomato, pepper, corn, onion, cilantro and salsa. Add in the cheese cubes and serve on a bowl lined with lettuce and topped with sour cream...seriously doesn't get much easier than that, right!!
ingredients
- 2cups cooked long grain rice, chilled
- 115 ounce canblack beans, rinsed and drained
- 2cups chopped tomatoes
- 1cup chopped yellow or red sweet pepper
- 1cup frozen whole kernel corn, thawed
- 2green onions, thinly sliced
- 2tablespoons snipped fresh cilantro
- 1cup bottled picante sauce or salsa
- 4ounces Monterey Jack cheese with jalapeno chile peppers, cut into 1/4-inch cubes (optional)
- Lettuce leaves
- 1/2cup fat-free or reduced-fat sour cream
directions
1.In large bowl, stir together chilled rice, beans, tomatoes, sweet pepper, corn, onions, and cilantro; add picante sauce or salsa. Toss to coat. Stir in cheese, if using.
2.Line six salad bowls or plates with lettuce leaves. Top with rice mixture. Serve with sour cream. Makes 6 servings.
And ya know what else I have found? If you make easy, fast meals that leads to more time playing Candy Crush...I so just need to delete that app. Cheers my friends!
Saturday, September 28, 2013
Blueberry Whoopie Pies & Soccer Life Lessons
Today I had the immense pleasure of getting a glimpse into a "soccer Moms" life and let me tell you it looks pretty stressful to me. One of my good friends has two sons who play soccer and they are both beyond cute so I decided to go out and cheer them on. The oldest one kind of has a crush on me so I really needed to make an appearance to stay in the heart of this 9 year old. Since I was going out to watch I decided to bring snacks, in the form of Blueberry Whoopie Pies.
Now let me say before I start talking about food, this whole soccer process is pretty high stress. I learned all about banners, every team has it's own banner, which is either made or purchased by the team, and they do banner competitions. Hmmmm. I also didn't realize that there is a "Team Mom," who is responsible for all things organizational dealing with the team, including snack, communicating schedules, organizing pictures, team parties, etc. I need a "Team Mom," to help me organize my life!

And the most important lesson I learned is that sometimes if your feelings are hurt, you are bummed out or disappointed in your performance you can drop to the ground and claim a "feeling injury." Seriously wouldn't you love to do that in real life or in the work force? Ya know you had a really crappy day, your boss is being an ass or you just got in trouble....just drop to the ground, start rolling around on your back and covering your face. Everything and everyone stops! You get a personal time out and then you can get up, dust yourself off and start back with your day. I may just have to try that next week at work and let you know how it goes. That is the coolest ever!
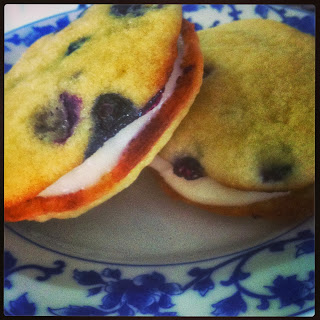
Ok so back to food, since this is a food blog. Blueberry Whoopie Pies remind of blueberry muffin tops with filling inside. Awesome! Or in the words of my bestie,"Ahhh-mazing," which I take to mean that she liked them. The filling is a cream cheese, powdered sugar and lemon filling, which is perfect with the moist blueberry cake cookie. These truly were decadent and perfect for any time of the day.
The cookies are easy to make, creaming the butter, sugar and vanilla in a mixer. Adding in the egg. Next alternating the dry ingredients, which are mixed together in a separate bowl, with the milk into the mixer. Finally carefully fold in the blueberries, you can be rough with them, if you don't care if your cookies turn out purple, that is totally your prerogative.
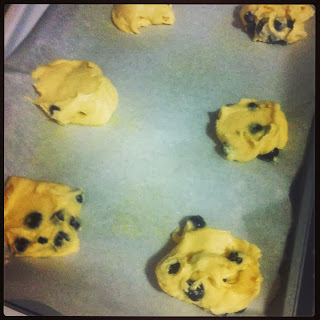
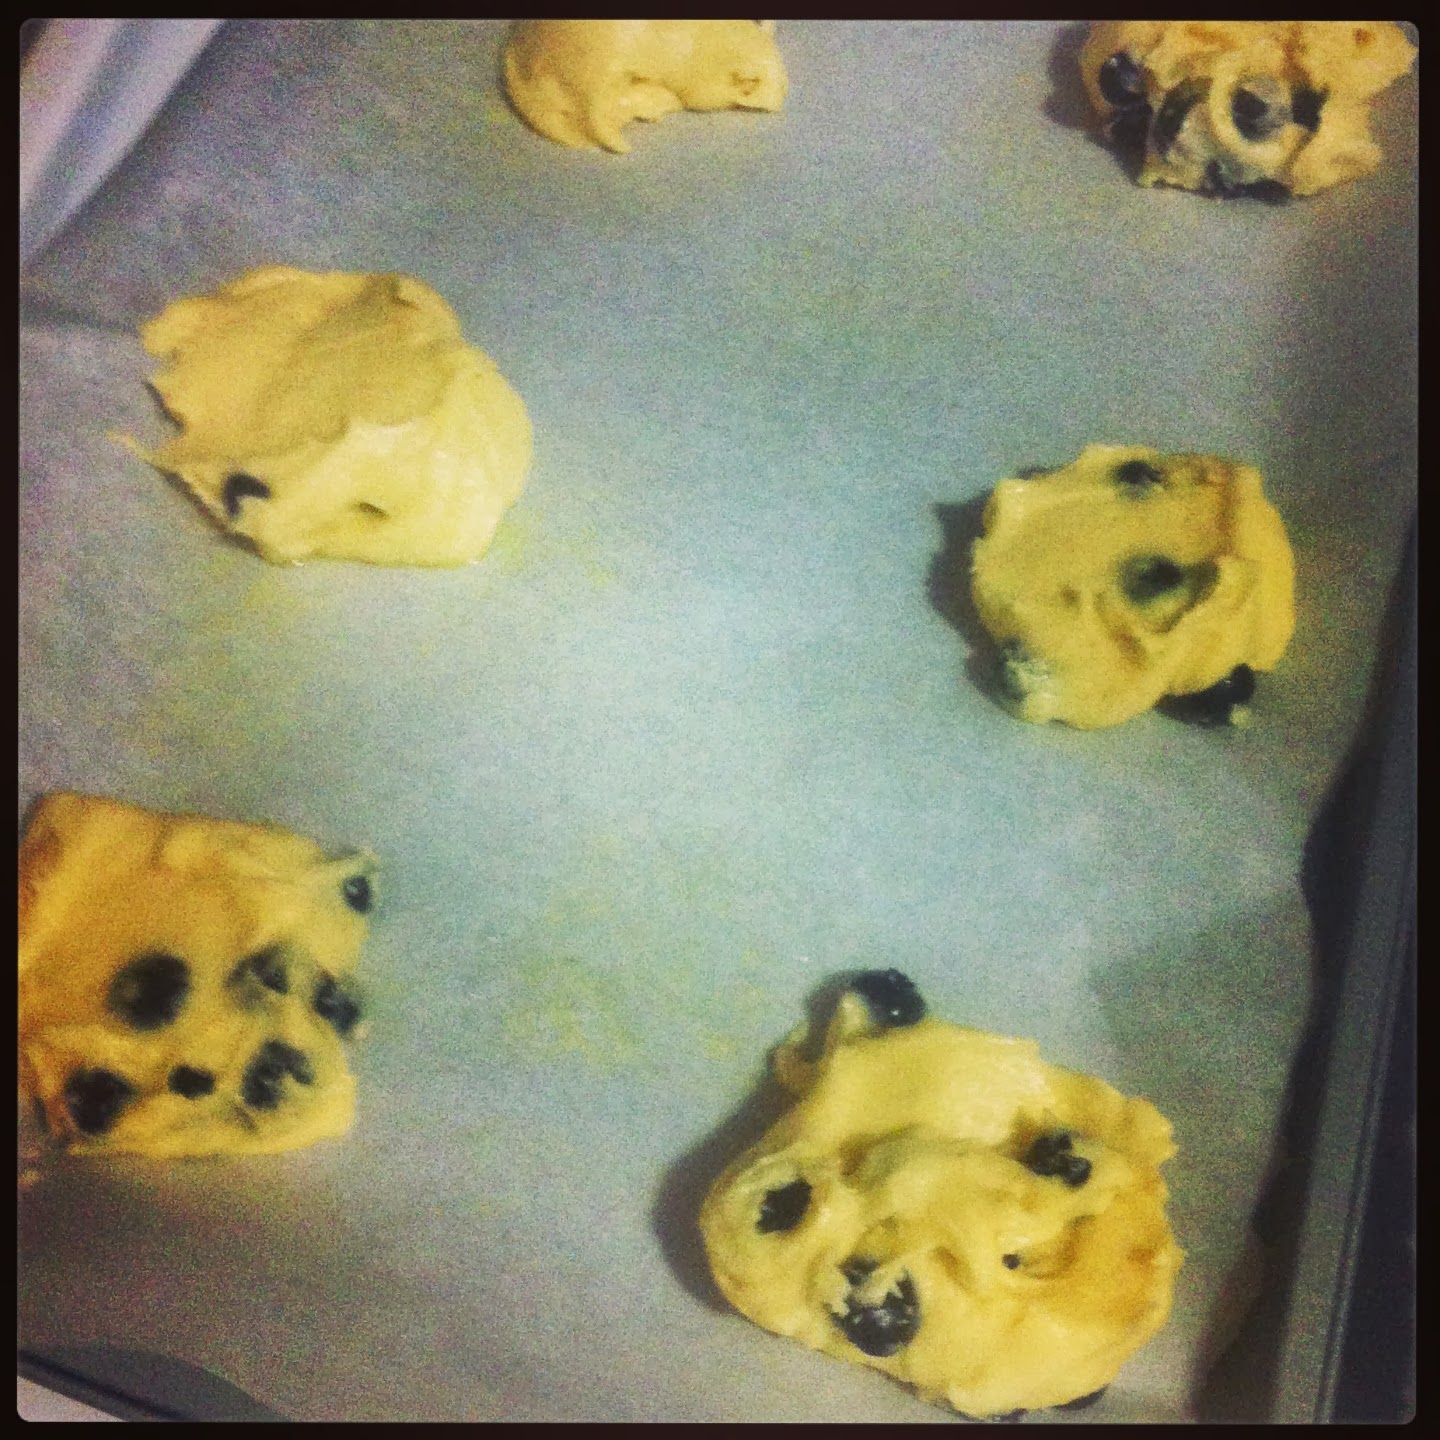
The batter is placed in mounds on a cookie sheet that is covered with parchment paper and baking spray. I learned a cool technique to smooth out cookie batter, wet your finger and run it over the batter, which creates a nice finish.
Refrigerate the batter for 30 minutes and then bake for 10-12 minutes in a 375 degree oven.

The filling is also made in the mixer, combining softened cream cheese and butter. Next add lemon zest, lemon juice and vanilla. Finally mixing in the powdered sugar.
Once the cookies are out of the oven let them cool completely before icing them. Spread 2T of icing over the flat side of 6 cookies and top with another cookie.
For the cookies:
1 1/2 cups all-purpose flour
1/2 teaspoon baking powder
1/2 teaspoon fine salt
1/4 teaspoon baking soda
5 tablespoons unsalted butter, softened
2/3 cup granulated sugar
1 teaspoon vanilla extract
1 large egg
1/3 cup milk
3/4 cup blueberries
Cooking spray
For the filling:
4 ounces cream cheese, at room temperature
3 tablespoons unsalted butter, softened
1 teaspoon finely grated lemon zest
1 tablespoon fresh lemon juice
1/2 teaspoon vanilla extract
Pinch of salt
1 1/2 cups confectioners' sugar
Directions
Position racks in the center and lower third of the oven and preheat to 375 degrees F. Make the cookies: Whisk the flour, baking powder, salt and baking soda in a medium bowl. Beat the butter, sugar and vanilla on medium-high speed in a stand mixer fitted with the paddle attachment until light and fluffy, about 5 minutes. Beat in the egg until combined, scraping down the bowl. Reduce the mixer speed to low and beat in the flour mixture and milk in 3 alternating batches. Fold in the blueberries with a rubber spatula.
Line 2 baking sheets with parchment paper; coat with cooking spray. Arrange mounds of batter, about 2 tablespoons each, 2 inches apart; smooth the tops with a damp finger. Chill until firm, 30 minutes.
Bake the cookies until lightly golden, rotating the pans halfway through, 10 to 12 minutes. Let cool on the pans for 5 minutes, then transfer to a rack to cool completely.
Make the filling: Beat the cream cheese, butter, lemon zest and juice, vanilla and salt with a mixer on medium speed until smooth. Beat in the confectioners' sugar on low speed until combined.
Assemble the whoopie pies: Spread 2 tablespoons of filling on the flat side of 6 cookies and sandwich with the remaining cookies. Serve immediately or refrigerate, covered, overnight
These truly were awesome snacks! They are huge, that is my only words of warning, but I have no problem with big cookies! They would be great as a portable super sweet breakfast, an afternoon snack or a fun dessert. Have fun with your kitchen this weekend! Cheers!

Now let me say before I start talking about food, this whole soccer process is pretty high stress. I learned all about banners, every team has it's own banner, which is either made or purchased by the team, and they do banner competitions. Hmmmm. I also didn't realize that there is a "Team Mom," who is responsible for all things organizational dealing with the team, including snack, communicating schedules, organizing pictures, team parties, etc. I need a "Team Mom," to help me organize my life!

And the most important lesson I learned is that sometimes if your feelings are hurt, you are bummed out or disappointed in your performance you can drop to the ground and claim a "feeling injury." Seriously wouldn't you love to do that in real life or in the work force? Ya know you had a really crappy day, your boss is being an ass or you just got in trouble....just drop to the ground, start rolling around on your back and covering your face. Everything and everyone stops! You get a personal time out and then you can get up, dust yourself off and start back with your day. I may just have to try that next week at work and let you know how it goes. That is the coolest ever!
Ok so back to food, since this is a food blog. Blueberry Whoopie Pies remind of blueberry muffin tops with filling inside. Awesome! Or in the words of my bestie,"Ahhh-mazing," which I take to mean that she liked them. The filling is a cream cheese, powdered sugar and lemon filling, which is perfect with the moist blueberry cake cookie. These truly were decadent and perfect for any time of the day.
The cookies are easy to make, creaming the butter, sugar and vanilla in a mixer. Adding in the egg. Next alternating the dry ingredients, which are mixed together in a separate bowl, with the milk into the mixer. Finally carefully fold in the blueberries, you can be rough with them, if you don't care if your cookies turn out purple, that is totally your prerogative.
The batter is placed in mounds on a cookie sheet that is covered with parchment paper and baking spray. I learned a cool technique to smooth out cookie batter, wet your finger and run it over the batter, which creates a nice finish.
 |
| Yes, I know they look like blueberry pancakes |
Refrigerate the batter for 30 minutes and then bake for 10-12 minutes in a 375 degree oven.

The filling is also made in the mixer, combining softened cream cheese and butter. Next add lemon zest, lemon juice and vanilla. Finally mixing in the powdered sugar.
Once the cookies are out of the oven let them cool completely before icing them. Spread 2T of icing over the flat side of 6 cookies and top with another cookie.
For the cookies:
1 1/2 cups all-purpose flour
1/2 teaspoon baking powder
1/2 teaspoon fine salt
1/4 teaspoon baking soda
5 tablespoons unsalted butter, softened
2/3 cup granulated sugar
1 teaspoon vanilla extract
1 large egg
1/3 cup milk
3/4 cup blueberries
Cooking spray
For the filling:
4 ounces cream cheese, at room temperature
3 tablespoons unsalted butter, softened
1 teaspoon finely grated lemon zest
1 tablespoon fresh lemon juice
1/2 teaspoon vanilla extract
Pinch of salt
1 1/2 cups confectioners' sugar
Directions
Position racks in the center and lower third of the oven and preheat to 375 degrees F. Make the cookies: Whisk the flour, baking powder, salt and baking soda in a medium bowl. Beat the butter, sugar and vanilla on medium-high speed in a stand mixer fitted with the paddle attachment until light and fluffy, about 5 minutes. Beat in the egg until combined, scraping down the bowl. Reduce the mixer speed to low and beat in the flour mixture and milk in 3 alternating batches. Fold in the blueberries with a rubber spatula.
Line 2 baking sheets with parchment paper; coat with cooking spray. Arrange mounds of batter, about 2 tablespoons each, 2 inches apart; smooth the tops with a damp finger. Chill until firm, 30 minutes.
Bake the cookies until lightly golden, rotating the pans halfway through, 10 to 12 minutes. Let cool on the pans for 5 minutes, then transfer to a rack to cool completely.
Make the filling: Beat the cream cheese, butter, lemon zest and juice, vanilla and salt with a mixer on medium speed until smooth. Beat in the confectioners' sugar on low speed until combined.
Assemble the whoopie pies: Spread 2 tablespoons of filling on the flat side of 6 cookies and sandwich with the remaining cookies. Serve immediately or refrigerate, covered, overnight
These truly were awesome snacks! They are huge, that is my only words of warning, but I have no problem with big cookies! They would be great as a portable super sweet breakfast, an afternoon snack or a fun dessert. Have fun with your kitchen this weekend! Cheers!
Friday, September 27, 2013
The Wine Closet-Camarillo, CA
I have been hearing about The Wine Closet for quite some time, but I just haven't made it there. Well it turns out they have been open for 4 years, so obviously it took me a lot longer than I thought to make it to this little slice of heaven. However, I am definitely glad I finally made the effort, because it feels like home. It is a super cute, comfortable and relaxed tasting room in Camarillo and I will definitely be back. It is truly the perfect place to sit down, hang out, talk and drink some really good wine.

I had the pleasure of meeting Linda, the Proprietor, and she was a joy. She was passionate about wine and it was evident that she truly enjoys what she does. For the space, they have an eclectic and diverse wine and beer assortment. They offer wine and beer by the glass and/or bottle. And they do tasting on Thursday, Friday and Saturdays. However, they are open Tuesday-Saturday. Thursday is the night they feature a different winery and often bring in guests from the vineyard/wineries. They also send an email in advancing celebrating the winery they are hosting for the week.

I loved the ambiance! There is a cute couch and chairs, that makes you feel like you are sitting in your own living room. There is also a hand full of high top tables and a bar, if you want that type of atmosphere. There is fun and colorful wine themed art and it is just a very inviting place to hang out.

The Wine Closet doesn't pour wines from one specific winery so they have an ever changing inventory. Today they were pouring wines from Loring and Barrel 27. Both of the wineries I had seen before, but I hadn't had the pleasure of tasting. I had a flight of four reds and I loved them all. The highlights for me were the Loring Pinot Noir and the Barrel 27 Syrah. Both very smooth, easy to drink, yet bold reds.

Loring is a winery that specializes in single vineyard wines. However, the Pinot I had today was a Central Coast wine, which means the fruit came from several vineyards in that area. Loring is known for its Pinor Noirs and Chardonnays and I would definitely recommend this wine.

Barrel 27 is a Paso Robles winery and I had their Syrah, Grenache and Zinfandel today and I would definitely drink all of them again. I love their motto,"Our goal is to make wine that works hard at helping hard working America relax for a minute, take a load off, and remove the nose from the grindstone for a while." They were definitely successful today as I sat there drinking their wine on a Friday afternoon, enjoying good company, good cheese and good times.

As many of you know I am also a cheese addict, so when I heard that The Wine Closet has cheese I knew I was definitely in the right place. I love all cheese, however the highlight was a caramelized onion cheddar-INCREDIBLE!! They also do other snack foods, but seriously it is pretty hard to beat cheese and wine.

The Wine Closet does also have a wine club, which offers 2-3 bottles, every other month. They have several options, depending on the price point and varietals you prefer. They are very flexible with the selections and try to cater to their club members.
Here is their web page if you want more information: http://www.wineclosetinc.com/
I can't wait to take my girlfriends back and just chill! Cheers!

I had the pleasure of meeting Linda, the Proprietor, and she was a joy. She was passionate about wine and it was evident that she truly enjoys what she does. For the space, they have an eclectic and diverse wine and beer assortment. They offer wine and beer by the glass and/or bottle. And they do tasting on Thursday, Friday and Saturdays. However, they are open Tuesday-Saturday. Thursday is the night they feature a different winery and often bring in guests from the vineyard/wineries. They also send an email in advancing celebrating the winery they are hosting for the week.
I loved the ambiance! There is a cute couch and chairs, that makes you feel like you are sitting in your own living room. There is also a hand full of high top tables and a bar, if you want that type of atmosphere. There is fun and colorful wine themed art and it is just a very inviting place to hang out.

The Wine Closet doesn't pour wines from one specific winery so they have an ever changing inventory. Today they were pouring wines from Loring and Barrel 27. Both of the wineries I had seen before, but I hadn't had the pleasure of tasting. I had a flight of four reds and I loved them all. The highlights for me were the Loring Pinot Noir and the Barrel 27 Syrah. Both very smooth, easy to drink, yet bold reds.

Loring is a winery that specializes in single vineyard wines. However, the Pinot I had today was a Central Coast wine, which means the fruit came from several vineyards in that area. Loring is known for its Pinor Noirs and Chardonnays and I would definitely recommend this wine.

Barrel 27 is a Paso Robles winery and I had their Syrah, Grenache and Zinfandel today and I would definitely drink all of them again. I love their motto,"Our goal is to make wine that works hard at helping hard working America relax for a minute, take a load off, and remove the nose from the grindstone for a while." They were definitely successful today as I sat there drinking their wine on a Friday afternoon, enjoying good company, good cheese and good times.

As many of you know I am also a cheese addict, so when I heard that The Wine Closet has cheese I knew I was definitely in the right place. I love all cheese, however the highlight was a caramelized onion cheddar-INCREDIBLE!! They also do other snack foods, but seriously it is pretty hard to beat cheese and wine.

The Wine Closet does also have a wine club, which offers 2-3 bottles, every other month. They have several options, depending on the price point and varietals you prefer. They are very flexible with the selections and try to cater to their club members.
Here is their web page if you want more information: http://www.wineclosetinc.com/
I can't wait to take my girlfriends back and just chill! Cheers!
Thursday, September 26, 2013
Tofu Curry
So the past couple of weeks have been crazy at work and one of the things I craved most was getting back into the kitchen. I often forget how much my kitchen is truly my sanctuary until I am away from it. So when I am stressed being in the kitchen is definitely my "happy place."

And I know this is going to sound strange because people don't usually say these words associated with tofu, but I love tofu. I don't know if it is a throwback from vegetarian days as a kid or if it has a texture I love or I just think it is awesome that it absorbs the flavor of anything I put on it. But I just think it is grand! And for once I am actually not being sarcastic.
 So the other night in the middle of computer/work stress I decided to make Sunset Magazine's Tofu Curry and it was awesome! It was also great leftover and it was nice to have healthy light food to take with me for lunches. The curry was spicy, but not too hot or overpowering, I love bok choy and bamboo shoots so that made me happy and the creamy flavor of coconut milk was just an incredible addition.

The recipe called for Madras Curry Powder. And if you are unfamiliar with curry powder they differ in the spice mixture and concentration of spices. Madras is known to be a little spicier than other varietals. However, all curry powders normally have a mixture of several key spices including but not limited to coriander, turmeric, mustard, fenugreek and red chile powder. The best analogy I have heard referring to curry powder is that it is like bbq sauce to Americans.

And believe it or not I actually followed this recipe pretty closely. I did not use fresh curry leaves, just because they weren't readily accessible to me and the same goes for the light palm sugar, but the recipe was awesome with brown sugar and curry powder.

And of course I had to buy Golden Star Coconut Milk because it sounds the most authentic...NOT! It was the only coconut milk available at the store I was at.
I really liked the technique used for preparing the tofu in this recipe. After you slice the tofu, you soak it in a bath of hot water and salt. I was curious as to the purpose of this technique so I did a little research. The hot water bath is utilized to create a better texture and crust on the tofu, and it really worked, as the tofu for this recipe had a nice spice crust and was not too moist.
After your tofu takes a bath, not to be confused with a bubble bath, blot it with paper towel, to get rid of the excess moisture.

Next fry sliced shallots in canola oil. I did use peanut oil, which is common in Asian cooking, due to its high heat point, well because I was out of canola oil. But it worked just great! Add garlic and curry powder and then remove from pan.
Fry tofu in the spice/oil mixture for approximately 4-5 minutes.

Add the shallot mixture back into the pan with the tofu, with the exception of a little bit that you will use for garnish. Next add the coconut milk, brown sugar and bamboo shoots and simmer. Finally add the bok choy and finish with the fish sauce.

Top with fresh herbs and the remaining shallot mixture. I used cilantro and it was awesome.
The recipe also recommends that you serve the curry over rice, but I just ate it by itself and it was wonderful!! This is definitely a great vegetarian meal idea and it is very healthy and flavorful. Cheers!

And I know this is going to sound strange because people don't usually say these words associated with tofu, but I love tofu. I don't know if it is a throwback from vegetarian days as a kid or if it has a texture I love or I just think it is awesome that it absorbs the flavor of anything I put on it. But I just think it is grand! And for once I am actually not being sarcastic.


The recipe called for Madras Curry Powder. And if you are unfamiliar with curry powder they differ in the spice mixture and concentration of spices. Madras is known to be a little spicier than other varietals. However, all curry powders normally have a mixture of several key spices including but not limited to coriander, turmeric, mustard, fenugreek and red chile powder. The best analogy I have heard referring to curry powder is that it is like bbq sauce to Americans.

And believe it or not I actually followed this recipe pretty closely. I did not use fresh curry leaves, just because they weren't readily accessible to me and the same goes for the light palm sugar, but the recipe was awesome with brown sugar and curry powder.

And of course I had to buy Golden Star Coconut Milk because it sounds the most authentic...NOT! It was the only coconut milk available at the store I was at.
I really liked the technique used for preparing the tofu in this recipe. After you slice the tofu, you soak it in a bath of hot water and salt. I was curious as to the purpose of this technique so I did a little research. The hot water bath is utilized to create a better texture and crust on the tofu, and it really worked, as the tofu for this recipe had a nice spice crust and was not too moist.
After your tofu takes a bath, not to be confused with a bubble bath, blot it with paper towel, to get rid of the excess moisture.

Next fry sliced shallots in canola oil. I did use peanut oil, which is common in Asian cooking, due to its high heat point, well because I was out of canola oil. But it worked just great! Add garlic and curry powder and then remove from pan.
Fry tofu in the spice/oil mixture for approximately 4-5 minutes.

Add the shallot mixture back into the pan with the tofu, with the exception of a little bit that you will use for garnish. Next add the coconut milk, brown sugar and bamboo shoots and simmer. Finally add the bok choy and finish with the fish sauce.

Top with fresh herbs and the remaining shallot mixture. I used cilantro and it was awesome.
- 14 to 16 oz. firm tofu
- 1 teaspoon salt
- 2 to 3 tbsp. canola oil
- 1/2 cup thinly sliced shallots
- 1 large garlic clove, finely chopped
- 6 to 8 fresh curry leaves (optional)*
- 1 1/2 teaspoons curry powder, preferably Madras
- 1 can (13.5 oz.) coconut milk
- 1/2 cup thinly sliced canned bamboo shoots, drained and rinsed
- 2 to 3 tsp. packed shaved light palm sugar* or light brown sugar
- 4 or 5 small heads baby bok choy (Shanghai bok choy), cut crosswise into 1-in. pieces
- 1 teaspoon Thai or Vietnamese fish sauce
- 1/2 cup coarsely chopped fresh herbs, such as mint, cilantro, Thai basil, or Vietnamese coriander (rau ram)
Preparation
- 1. Cut tofu into 16 rectangles shaped like husky dominoes (each about 1 in. wide, 1 1/2 in. long, and 1 in. thick). Put tofu in a wide, shallow bowl. Mix 1 tsp. salt with 2 cups very hot or just-boiled water and pour over tofu to just cover. Let sit 15 minutes. Transfer tofu to a double layer of paper towels set on a plate and let drain 10 minutes.
- 2. Meanwhile, heat 2 tbsp. oil in a medium nonstick frying pan over medium heat. Fry shallots, stirring occasionally, until light golden, 9 to 10 minutes. Add garlic and curry leaves and fry 2 to 3 minutes, stirring constantly, until light and crisp. Add curry powder, remove from heat, and stir to aromatize spices. Using a slotted spoon or skimmer, transfer seasonings to a bowl, leaving most of fragrant oil in pan.
- 3. Blot tofu dry. Add more oil to pan, if needed, to film bottom and heat to medium-high. Fry tofu, turning once, until golden, 4 to 5 minutes (it won't be crisp).
- 4. Lower heat slightly and return all but 1 tbsp. shallot mixture to pan. Add coconut milk, bamboo shoots, and palm sugar. Bring to a simmer and cook 2 to 3 minutes. Add bok choy and cook until tender, 3 to 5 minutes. Gently stir in fish sauce.
- 5. Transfer to a serving bowl and top with herbs and rest of shallots. Serve with rice.
The recipe also recommends that you serve the curry over rice, but I just ate it by itself and it was wonderful!! This is definitely a great vegetarian meal idea and it is very healthy and flavorful. Cheers!
Sunday, September 22, 2013
Happy Fall & My First Soup Recipe of the Season!!
As many of you know I am a soup addict!! Please do not get this confused with the soup nazi, as I share soup very well...I think. However, I could truly live on soup! Actually if we are being totally honest there have been periods of time in my life where I did really subsist on soup...sure usually they were during a break-up or depression, but honestly I do love soup. And I am not just talking about one type of soup, I am an equal opportunity soup lover. So last night, my bff and I were wearing sweatshirts, a true sign that Fall was in the air...please let's not analyze the fact that it was 75 degrees outside...I decided to make soup for our night of scary movies and dinner. And since today is the first official day of Fall I decided to share this delicious recipe.

I made Sunset's Snap Pea Minestrone with Poached Eggs. I love poached eggs in soup. I know that poached eggs have been a soup accesory for a very long time, however I just discovered this addition last year. I first tried poached eggs in a soup recipe with bread and bacon that came from Food Network and I have been a believer ever since. This soup did not disappoint!
All joking aside this was probably one of the best soups I have had in a very long time. I loved the fresh vegetables, the salt from the ham and chicken broth, the licorice flavor from the fresh tarragon and the creamy texture of the poached egg. I also really enjoyed the orzo pasta as I have made minestrone in the past and unfortunately the large noodles tend to suck up all of the broth. The orzo did absorb some broth, but nothing to the extreme I have witnessed before. I also love the nutty flavor that Parmesan cheese adds to soup and this recipe had a ton-o-Parmesan. Love!

So cook the carrot, leek, ham and green onions in butter. I know a lot of recipes call for oil, but this one called for butter and I definitely think butter adds an rich flavor to...well anything, but it worked well in this soup.

While you are sauteeing the vegetables and ham bring water and vinegar to a simmer. Make sure to add the vinegar to the water because it helps the eggs stay more solid and not just scramble in the water. Also I recommend white vinegar because otherwise you can discolor the eggs, which is usually not the look you are going for.

Add the broth to the eggs and once it boils, add the pasta. Stir in the peas and bring the soup back to a boil. Finally add the Parmesan and fresh tarragon.

Ladle the soup into bowls and top each bowl with a poached egg. Sprinkle with additional Parmesan.
Here is the official recipe if you want measurements:
1/2 cup diced ham
1 carrot, peeled and cut into small dice
1 leek, white and light green parts only, thinly sliced into half-moons and rinsed well
1/3 cup sliced green onions
1 tablespoon butter
1 teaspoon distilled white vinegar
4 large eggs
5 cups reduced-sodium chicken broth
About 1/4 tsp. pepper
1/2 cup tiny pasta, such as farfalline or orzo
2 1/2 cups diagonally sliced sugar snap peas
About 1/2 cup grated parmesan cheese
About 2 tsp. chopped fresh tarragon leaves
Preparation
1. Cook ham, carrot, leek, and green onions with butter in a large pot over medium heat until vegetables soften, about 5 minutes.
2. Meanwhile, in a large saucepan, warm vinegar and 1 1/2 in. water over high heat until bubbles form on pan bottom, then reduce heat to medium-low. Break eggs into water, keeping them slightly apart. Cook until whites are firm but yolks are still soft, 3 to 4 minutes. Transfer eggs with a slotted spoon to a plate.
3. Add broth and 1/4 tsp. pepper to vegetables. Cover and bring to a boil over high heat. Add pasta and boil gently, uncovered and stirring occasionally, until tender, 7 to 8 minutes. Stir in snap peas and return to a boil, then stir in 1/2 cup parmesan, 2 tsp. tarragon, and more pepper to taste.
4. Ladle into bowls and top each with a poached egg. Serve with more cheese, tarragon, and pepper if you like.
 So Happy Fall Y'all! Hope you enjoy this soup recipe as much as I did. I do have to say that although we pretty much only have one season in beautiful So Cal, Fall is my favorite, primarily because I love pumpkin everything. I am making pumpkin bars as I type and dang my house smells incredible!! So be prepared to hear about pumpkin bars with cream cheese frosting tomorrow. Cheers!

P.S. Shout out to my bestie for being my best little food photographer and to Beau my favorite kitchen dog XOXO

I made Sunset's Snap Pea Minestrone with Poached Eggs. I love poached eggs in soup. I know that poached eggs have been a soup accesory for a very long time, however I just discovered this addition last year. I first tried poached eggs in a soup recipe with bread and bacon that came from Food Network and I have been a believer ever since. This soup did not disappoint!
All joking aside this was probably one of the best soups I have had in a very long time. I loved the fresh vegetables, the salt from the ham and chicken broth, the licorice flavor from the fresh tarragon and the creamy texture of the poached egg. I also really enjoyed the orzo pasta as I have made minestrone in the past and unfortunately the large noodles tend to suck up all of the broth. The orzo did absorb some broth, but nothing to the extreme I have witnessed before. I also love the nutty flavor that Parmesan cheese adds to soup and this recipe had a ton-o-Parmesan. Love!

So cook the carrot, leek, ham and green onions in butter. I know a lot of recipes call for oil, but this one called for butter and I definitely think butter adds an rich flavor to...well anything, but it worked well in this soup.

While you are sauteeing the vegetables and ham bring water and vinegar to a simmer. Make sure to add the vinegar to the water because it helps the eggs stay more solid and not just scramble in the water. Also I recommend white vinegar because otherwise you can discolor the eggs, which is usually not the look you are going for.

Add the broth to the eggs and once it boils, add the pasta. Stir in the peas and bring the soup back to a boil. Finally add the Parmesan and fresh tarragon.

Ladle the soup into bowls and top each bowl with a poached egg. Sprinkle with additional Parmesan.
Here is the official recipe if you want measurements:
1/2 cup diced ham
1 carrot, peeled and cut into small dice
1 leek, white and light green parts only, thinly sliced into half-moons and rinsed well
1/3 cup sliced green onions
1 tablespoon butter
1 teaspoon distilled white vinegar
4 large eggs
5 cups reduced-sodium chicken broth
About 1/4 tsp. pepper
1/2 cup tiny pasta, such as farfalline or orzo
2 1/2 cups diagonally sliced sugar snap peas
About 1/2 cup grated parmesan cheese
About 2 tsp. chopped fresh tarragon leaves
Preparation
1. Cook ham, carrot, leek, and green onions with butter in a large pot over medium heat until vegetables soften, about 5 minutes.
2. Meanwhile, in a large saucepan, warm vinegar and 1 1/2 in. water over high heat until bubbles form on pan bottom, then reduce heat to medium-low. Break eggs into water, keeping them slightly apart. Cook until whites are firm but yolks are still soft, 3 to 4 minutes. Transfer eggs with a slotted spoon to a plate.
3. Add broth and 1/4 tsp. pepper to vegetables. Cover and bring to a boil over high heat. Add pasta and boil gently, uncovered and stirring occasionally, until tender, 7 to 8 minutes. Stir in snap peas and return to a boil, then stir in 1/2 cup parmesan, 2 tsp. tarragon, and more pepper to taste.
4. Ladle into bowls and top each with a poached egg. Serve with more cheese, tarragon, and pepper if you like.


P.S. Shout out to my bestie for being my best little food photographer and to Beau my favorite kitchen dog XOXO
Saturday, September 21, 2013
Girls Night & Fig-Prosciutto Pizza
"I cannot even imagine where I would be today were it not for that handful of friends who have given me a heart full of joy. Let's face it, friends make life a lot more fun." -Charles R. Swindoll


I truly have been blessed to have some of the most incredible girlfriends. And since my work schedule has been crazy and hectic I haven't been able to spend much time with them, however last night made up for it. We all decided to take over a friends kitchen and drink wine and cook dinner together. It was so completely the perfect night filled with good wine, laughter, good food and super cute aprons!!
We all brought a component of the meal-stuffed mushrooms, beet and arugula salad, wine, apple crisp and I decided to make Pioneer Woman's Fig-Prosciutto Pizza.

We started with one of our favorite wines, Cocobon, which can be found at Trader Joe's. It is a red blend from Livermore, California and it is just a smooth fruit forward easy to drink one. It has become our go-to wine for girls nights. Love it!

The appetizer course was stuffed mushrooms, which are always one of my favorites. These were stuffed with cheese, a blend of mozzarella and cream cheese with herbs and bacon on top.

Seriously could have eaten the entire tray of these!

The salad was a beet salad with arugula, toasted walnuts and goat cheese. Perfect Fall Salad!

The Fig-Prosciutto Pizza was awesome! I am honestly not a huge fig fan in general, but this pizza was incredible. The spice of the arugula, the sweetness from the figs, the creamy mozzarella and the soft and chewy pizza crust, was seriously a slice of heaven.


I cheated on the crust and purchased the dough from Fresh and Easy, but it was really good! Don't forget to leave it out so it gets to room temperature. It makes it so much easier to work with!

Spread the fig preserves on the dough.

Layer with sliced fresh mozzarella and bake.

Once it has baked, layer the prosciutto and arugula on top and serve with shaved Parmesan.

I love this recipe, however I did find that the recipe calls for a lot more ingredients than I could fit on the pizza. I had leftover mozzarella, prosciutto and arugula, just because I couldn't fit it all onto the crust. But hell that just allowed us to use some of the arugula for the salad, snack on mozzarella and take some prosciutto home.
Here is the link for the actual recipe: http://thepioneerwoman.com/cooking/2011/09/fig-prosciutto-pizza-with-arugula/

We rounded out the evening with apple crisp, which unfortunately I didn't take a picture of the finished product, because by the time we got to dessert we were in a food coma and I was too lazy to get up from the table. Yes, this is me being completely honest here.

I loved every minute of the evening and now I am headed to the gym to try and work off this magnificent meal. Cheers!
Thursday, September 19, 2013
9 Layer Salad

My best friends Mom made this salad a few years ago for me and I was in love. I have used this salad several times as a potluck salad or to bring to ailing or recovering friends. I made this salad yesterday to bring to a friend who was recovering from surgery. My running club volunteered to bring her dinner this month and I wanted to do something other than the standard lasagna or enchiladas. Don't get me wrong I love them both, but sometimes they just seem too hot on a warm day. And I know that when I feel like crap I crave fresh veggies and bacon, so I went with this.

Layer #1: 1 head of finely chopped lettuce-I use iceberg just because that is what everyone normally likes, but you can use any lettuce you want

Layer #2: Green onion, 1 cup chopped

Layer #3: 4 hard boiled eggs, chopped

Layer #4: Peas, 1 16 oz bag of frozen peas defrosted

Layer #5: Salad dressing-1 cup light sour cream and 1 cup mayo mixed and spread over salad

Layer #6: Shredded cheddar cheese, 2 cups

Layer #7: 3 tomatoes, chopped

Layer #8: Black olives-1 can of sliced black olives, probably could even use 2 cans but I love black olives

Layer #9: Bacon-1/2 lb cooked crumbled back YUMMY!!

Put all those layers together and 9 Layer Salad!

Subscribe to:
Posts
(Atom)
Visit My Website!


