Thursday, August 29, 2013
Breakfast of Champions!! Hole In One or Eggs In A Hole
So I never do breakfast blogs and today I decided to mix it up a bit. So I know the actual recipe is Eggs In A Hole, but for some reason I have a mental block against that name and I want to call it Hole in One. It is not like I am an avid golfer who is obsessed with the hole in one quest, it is just a mental block. Kind of like Bed and Breakfasts, for some reason I always want to call them Bread and Breakfasts, but that makes absolutely no sense at all.

I thought this recipe was a great idea as it included all of the breakfast food components I love-bread, bacon, cheese and eggs. Sounds like a win/win to me, right? However, I did discover that if you are like me, where you only like your eggs well done, this recipe doesn't go quite as well. I found that in order to get the eggs to a solidified state you have to cook them in the oven longer which gets the bread a bit crispy. Next time I make this I may try skipping the toasting of the bread ahead of time and see if it toasts up in the oven, therefore skipping the charred bread state.
Other than that discovery, I really like recipe. I liked having everything in a compact little state. The bacon tasted like heaven, my only complaint was that I wanted more of it. Yes, I know this is a Cooking Light recipe, but one slice of bacon for 4 servings, that is just a bacon tease. The Parmesan added a nice flavor to the eggs and bread just makes me happy.
The recipe is also really easy, especially for me who do not excel at mornings, such as myself. Toast the bread and cut the center out of them. The recipe says to use a cookie cutter or biscuit cutter, which I didn't have, so I took my vitamin bottle and just cut around it with a knife and that worked fine.

Next toast the bread. Meanwhile, put the bacon on a hot pan in the oven. I have to say that I never have the best luck with oven cooked bacon. I do like my bacon crispy and it just never seems to get crispy enough in the oven or it takes so long I get inpatient....oopsie.

Next put the bread on the hot pan and crack the eggs in the center. Put the grated Parmesan, chopped bacon, sage (I didn't have any so I didn't use it), salt and pepper. Bake until the egg whites are set.
 Here is the actual recipe:
1 slice bacon
4 (1-ounce) slices multigrain bread, lightly toasted
4 large eggs
4 teaspoons grated fresh pecorino Romano cheese (about 1/4 ounce)
1 teaspoon chopped fresh sage
1/4 teaspoon freshly ground black pepper
Preparation
1. Position an oven rack in the middle setting. Place a jelly-roll pan on rack. Preheat oven to 400°.
2. Place bacon on heated pan, and cook until crisp (about 4 minutes); crumble. Cut a hole into the center of each toast using a 3-inch biscuit cutter or round cookie cutter. Reserve cutouts.
3. Arrange bread slices on hot pan; crack one egg into each hole. Sprinkle eggs evenly with crumbled bacon, cheese, and sage. Bake at 400° for 5 minutes or until egg whites are set. Sprinkle with pepper, and serve with toast cutout.
Hope you all are having a wonderful week. Cheers my friends!

I thought this recipe was a great idea as it included all of the breakfast food components I love-bread, bacon, cheese and eggs. Sounds like a win/win to me, right? However, I did discover that if you are like me, where you only like your eggs well done, this recipe doesn't go quite as well. I found that in order to get the eggs to a solidified state you have to cook them in the oven longer which gets the bread a bit crispy. Next time I make this I may try skipping the toasting of the bread ahead of time and see if it toasts up in the oven, therefore skipping the charred bread state.
Other than that discovery, I really like recipe. I liked having everything in a compact little state. The bacon tasted like heaven, my only complaint was that I wanted more of it. Yes, I know this is a Cooking Light recipe, but one slice of bacon for 4 servings, that is just a bacon tease. The Parmesan added a nice flavor to the eggs and bread just makes me happy.
The recipe is also really easy, especially for me who do not excel at mornings, such as myself. Toast the bread and cut the center out of them. The recipe says to use a cookie cutter or biscuit cutter, which I didn't have, so I took my vitamin bottle and just cut around it with a knife and that worked fine.

Next toast the bread. Meanwhile, put the bacon on a hot pan in the oven. I have to say that I never have the best luck with oven cooked bacon. I do like my bacon crispy and it just never seems to get crispy enough in the oven or it takes so long I get inpatient....oopsie.

Next put the bread on the hot pan and crack the eggs in the center. Put the grated Parmesan, chopped bacon, sage (I didn't have any so I didn't use it), salt and pepper. Bake until the egg whites are set.

1 slice bacon
4 (1-ounce) slices multigrain bread, lightly toasted
4 large eggs
4 teaspoons grated fresh pecorino Romano cheese (about 1/4 ounce)
1 teaspoon chopped fresh sage
1/4 teaspoon freshly ground black pepper
Preparation
1. Position an oven rack in the middle setting. Place a jelly-roll pan on rack. Preheat oven to 400°.
2. Place bacon on heated pan, and cook until crisp (about 4 minutes); crumble. Cut a hole into the center of each toast using a 3-inch biscuit cutter or round cookie cutter. Reserve cutouts.
3. Arrange bread slices on hot pan; crack one egg into each hole. Sprinkle eggs evenly with crumbled bacon, cheese, and sage. Bake at 400° for 5 minutes or until egg whites are set. Sprinkle with pepper, and serve with toast cutout.
Hope you all are having a wonderful week. Cheers my friends!
Wednesday, August 28, 2013
Orzo Pasta Salad-Perfect for Labor Day!!
Is it just me or does anyone else get Labor Day and Memorial Day confused? I know that is not so cool to admit, especially since one holiday commemorates those who served and lost their lives fighting for our country and the other just has to do with work. But I always forget which one is in September and which one is in May. And since both of them are celebrated with bbq's and beer, it just gets down right confusing...well to me. But yes I know that this weekend is Labor Day...I think, right?

So all day I was thinking I was going to make breakfast for dinner tonight, but when I was at the gym, I had an epiphany. I did not want breakfast for dinner, I wanted pasta. So while I was on the elliptical, thankfully I am a pretty good multi-tasker, because seriously no one wants to fall off an exercise machine because they are looking at recipes while working out. Just sayin'...I came across this Cooking Light recipe for Mediterranean Orzo Pasta Salad.
And I have to say I am a happy camper that I did. This is a really easy, yummy, summer recipe and it is good slightly warm and chilled, whatever you prefer. There is nothing scary in it like mayo or hard boiled eggs so you can transport it to your picnic or bbq without fears of poisoning and killing all of the guests, am I the only one that thinks like that?
Slight regression story, so today we were doing computer training at work, and one of the girls I work with was talking about how prepared she is for disasters. So I declare that I am coming to her house in the event of a disaster, she has everything-food, water, medication, dog food, you name it. And no I will not give you her address because she is my best kept secret. Anyway she goes on to tell us that the only disaster supplies she is missing is a raft. A what, you might be asking yourself? Which is pretty much what I said and she responded with a raft, she needed a raft. Ya know in the event of a tsunami or flood, she needs a raft. So I promised her that when she retires we will all chip in and buy her a raft. Most random thing ever!! Hysterical!! Thank you MB!!
But all joking aside this recipe was awesome. I love the pasta, the saltiness of the olives, the spice of the red onion, the feta and the sweetness of the sun dried tomatoes. And I just friggin love artichoke hearts. No joke, I seriously eat a jar of artichoke hearts for dinner on some night and I am just as happy as a clam. The spinach gives it a nice fresh kick and the salt, pepper and artichoke marinade is perfect and light. I was really pleased with the results.

First cook the orzo pasta, according to package directions. By the way, if anyone needs orzo, that seems to be my only disaster supplies, I have a crap load of it, and I am willing to share.

Next chop the spinach and combine with the red onion, olives, salt and pepper.
Chop the artichoke hearts. And toss the marinade from the artichoke hearts with the feta.

Add the orzo pasta to the spinach mix and add in the artichokes and marinade/feta mix. Toss until combined and enjoy!! I enjoyed this dish with a nice glass of Opolo Syrah and it was perfect.
 Here is the actual recipe:
1 cup uncooked orzo (rice-shaped pasta; about 8 ounces)
2 cups bagged prewashed baby spinach, chopped $
1/2 cup chopped drained oil-packed sun-dried tomato halves
3 tablespoons chopped red onion
3 tablespoons chopped pitted kalamata olives
1/2 teaspoon freshly ground black pepper
1/4 teaspoon salt
1 (6-ounce) jar marinated artichoke hearts, undrained
3/4 cup (3 ounces) feta cheese, crumbled and divided
Preparation
Cook the orzo according to package directions, omitting salt and fat. Drain; rinse with cold water. Combine orzo, spinach, and next 5 ingredients (through salt) in a large bowl.
Drain artichokes, reserving marinade. Coarsely chop artichokes, and add artichokes, reserved marinade, and 1/2 cup feta cheese to orzo mixture, tossing gently to coat. Sprinkle each serving with remaining feta cheese.
Tomorrow is my Friday and you know how right before you go on vacation you start the countdown, I am there. I leave on Wednesday for New Orleans and I am so excited! I am completely ready to eat my way through that City and of course I found a gym too. Happy Hump Day Y'all!!

So all day I was thinking I was going to make breakfast for dinner tonight, but when I was at the gym, I had an epiphany. I did not want breakfast for dinner, I wanted pasta. So while I was on the elliptical, thankfully I am a pretty good multi-tasker, because seriously no one wants to fall off an exercise machine because they are looking at recipes while working out. Just sayin'...I came across this Cooking Light recipe for Mediterranean Orzo Pasta Salad.
And I have to say I am a happy camper that I did. This is a really easy, yummy, summer recipe and it is good slightly warm and chilled, whatever you prefer. There is nothing scary in it like mayo or hard boiled eggs so you can transport it to your picnic or bbq without fears of poisoning and killing all of the guests, am I the only one that thinks like that?
Slight regression story, so today we were doing computer training at work, and one of the girls I work with was talking about how prepared she is for disasters. So I declare that I am coming to her house in the event of a disaster, she has everything-food, water, medication, dog food, you name it. And no I will not give you her address because she is my best kept secret. Anyway she goes on to tell us that the only disaster supplies she is missing is a raft. A what, you might be asking yourself? Which is pretty much what I said and she responded with a raft, she needed a raft. Ya know in the event of a tsunami or flood, she needs a raft. So I promised her that when she retires we will all chip in and buy her a raft. Most random thing ever!! Hysterical!! Thank you MB!!
But all joking aside this recipe was awesome. I love the pasta, the saltiness of the olives, the spice of the red onion, the feta and the sweetness of the sun dried tomatoes. And I just friggin love artichoke hearts. No joke, I seriously eat a jar of artichoke hearts for dinner on some night and I am just as happy as a clam. The spinach gives it a nice fresh kick and the salt, pepper and artichoke marinade is perfect and light. I was really pleased with the results.

First cook the orzo pasta, according to package directions. By the way, if anyone needs orzo, that seems to be my only disaster supplies, I have a crap load of it, and I am willing to share.

Next chop the spinach and combine with the red onion, olives, salt and pepper.
Chop the artichoke hearts. And toss the marinade from the artichoke hearts with the feta.

Add the orzo pasta to the spinach mix and add in the artichokes and marinade/feta mix. Toss until combined and enjoy!! I enjoyed this dish with a nice glass of Opolo Syrah and it was perfect.

1 cup uncooked orzo (rice-shaped pasta; about 8 ounces)
2 cups bagged prewashed baby spinach, chopped $
1/2 cup chopped drained oil-packed sun-dried tomato halves
3 tablespoons chopped red onion
3 tablespoons chopped pitted kalamata olives
1/2 teaspoon freshly ground black pepper
1/4 teaspoon salt
1 (6-ounce) jar marinated artichoke hearts, undrained
3/4 cup (3 ounces) feta cheese, crumbled and divided
Preparation
Cook the orzo according to package directions, omitting salt and fat. Drain; rinse with cold water. Combine orzo, spinach, and next 5 ingredients (through salt) in a large bowl.
Drain artichokes, reserving marinade. Coarsely chop artichokes, and add artichokes, reserved marinade, and 1/2 cup feta cheese to orzo mixture, tossing gently to coat. Sprinkle each serving with remaining feta cheese.
Tomorrow is my Friday and you know how right before you go on vacation you start the countdown, I am there. I leave on Wednesday for New Orleans and I am so excited! I am completely ready to eat my way through that City and of course I found a gym too. Happy Hump Day Y'all!!
Tuesday, August 27, 2013
Dealing With Vintages Is A....Bitch
So I first discovered this wine several years ago at my favorite wine bar, WineYard, in Thousand Oaks. Let me start by saying I love Grenache, it is truly one of my favorite varietals. And when I saw this cute pink sassy label, of course I had to try it, because I seriously thought I might have discovered my "signature wine." And every REAL food/wine blogger needs a signature wine, right?

At the time they were pouring the Bitch, it was a 2007, and it was robust and fruit forward Grenache with a dry finish. It was nice! The Bitch line also had a sparkling wine and it was in a cute little bottle, perfect for stocking stuffers, so I swear every female on my Christmas list got a bottle that year. And well then the Bitch disappeared.
I saw it back on the market a few months ago and so I bought it. The 2009 was on the shelves and so that is what came home with me. Last night, after a late night at work, I decided to open the bottle and sit down on the couch to watch some reality tv with my Bitch. The description says the wine is,"Dark cherry and raspberry. Spicy, peppery and hints of anise." It is supposed to have balanced acidity with a sweet fruit palate.
Well I just didn't get that. I thought the wine was a bit acidic and to me it had a strong alcohol finish. Yes, it was fruity...a bit...and I did get the raspberry, but it my opinion it just didn't resemble the Grenaches I love.
I know the years are different and I learned several years ago that varietals are a bitch, after falling in love with a 2005, only to be left confused, sad and depressed with the 2006. So I definitely thought that could be a distinct difference with this one, but I wanted to know more.
So I started to do some research to see what had changed and to try and figure out where it went. The first thing I noticed was that it was strange that the winery "R Winery" did not have a web site or market itself on-line. Most wineries/vineyards have a strong on-line presence. Sure R Winery had plenty of locations where their wine could be purchased, but not a web page specific for their winery.
The next thing I learned was that the 2007 was made in Australia, which is what I remembered. And the 2009 was made in Spain. It has grapes that were sourced in Aragon and Navarra. Well that would create quite a distinct difference in taste.
Upon further research I learned that the entire production had moved from Australia to Spain. I also found that several web pages, that were selling the Bitch, had the country of origin incorrect in it's description. I also read one article that said the country move was due to financial troubles.
I also learned that the 2009 was un-oaked. I don't remember if the 2007 was oaked or not, but I thought it was out of the ordinary for a Grenache not to be aged in oak. Just a thought.
The wine is still being made by the same winemaker, Chris Ringland, who is a well known Australian winemaker, who is best known for his Syrahs. He started making wines when he was 12, is that legal? Regardless, that is still a cool fact. Robert Parker actually said that Ringland's Syrah was,"arguably the greatest Syrah made in Australia," and that is quite a compliment.
Overall, I would say the label is fun and a great gift, the wine is drinkable but not incredible and due to the high alcohol flavor I think this would be a hard wine to pair with food. I guess what I am trying to say is that life is sometimes just a Bitch.
Monday, August 26, 2013
Grey Cookies? Macadamia Raspberry White Chocolate Cookies
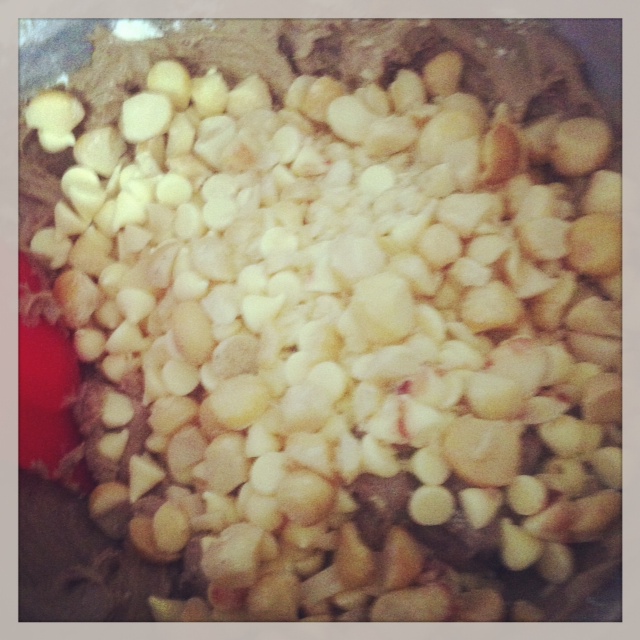
So I made Macadamia Raspberry White Chocolate Cookies, all things that I enjoy, so I figured how could I go wrong by placing them together, right? Well the taste is awesome, the macadamia nuts are creamy, nutty and slightly salty, the raspberry is tart and tangy and the white chocolate is sweet and smooth. So taste is great, but um color....yeah not so much!!

When I first found the recipe the photo displayed looked like this:

And when I went back to look at the recipe again after seeing the color of my cookies, I found a second picture behind the first that looks like this:

And well there are my cookies that look more like the second and maybe even a little worse:

So this is just my opinion, but I don't think the first picture attached to this recipe was made using this recipe...because the minute you mix the flour into the raspberry mixture your cookies go from a pinkish purple color to grey, and I am not talking sexy 50 Shades of Grey. I am talking hmmm cookies are not supposed to be this color grey.
Here is the recipe if you would like to give it a try yourself and please let me know if you achieve different results: http://allrecipes.com/recipe/macadamia-raspberry-white-chocolate-cookies/
I do have to say this recipe is as easy as cookie recipes come. You do mix everything in one mixing bowl, stir in the nuts and white chocolate chips, bake and voila.
First cream the butter and the sugar. Easy enough and still a normal cookie color.
 Add the egg, looking good!! Next add the raspberry jam and vanilla. Interesting now I have purple cookies, different but still somewhat appetizing.

Add in the flour and you get....concrete!!! I don't think anyone ever said,"oh look wet concrete, I wish I could eat that."

Fold in the nuts and white chocolate chips....cookies are still grey.

Take them out of the oven...yes still grey!!
Now because I love random facts, did you know that grey and gray are variations of the same word, referring to the same color? Gray is more commonly used in American English and Grey is used everywhere else in the world. Happy Monday!! And if you want some grey cookies, please let me know I have a ton.

When I first found the recipe the photo displayed looked like this:

And when I went back to look at the recipe again after seeing the color of my cookies, I found a second picture behind the first that looks like this:
And well there are my cookies that look more like the second and maybe even a little worse:

So this is just my opinion, but I don't think the first picture attached to this recipe was made using this recipe...because the minute you mix the flour into the raspberry mixture your cookies go from a pinkish purple color to grey, and I am not talking sexy 50 Shades of Grey. I am talking hmmm cookies are not supposed to be this color grey.
Here is the recipe if you would like to give it a try yourself and please let me know if you achieve different results: http://allrecipes.com/recipe/macadamia-raspberry-white-chocolate-cookies/
I do have to say this recipe is as easy as cookie recipes come. You do mix everything in one mixing bowl, stir in the nuts and white chocolate chips, bake and voila.
First cream the butter and the sugar. Easy enough and still a normal cookie color.


Add in the flour and you get....concrete!!! I don't think anyone ever said,"oh look wet concrete, I wish I could eat that."
Fold in the nuts and white chocolate chips....cookies are still grey.

Take them out of the oven...yes still grey!!
Now because I love random facts, did you know that grey and gray are variations of the same word, referring to the same color? Gray is more commonly used in American English and Grey is used everywhere else in the world. Happy Monday!! And if you want some grey cookies, please let me know I have a ton.
Sunday, August 25, 2013
Peach Cobbler Muffins...eh just ok
So do you ever have REALLY high expectations for a recipe and because of that they just don't always meet your expectations? That is pretty much what happened with these Peach Cobbler Muffins. I had visions of sitting down with an espresso and a muffin after my run. I pictured my muffin to be moist, light and flakey, like well a cobbler....a peach one to be exact. And this just tastes like a muffin....one that wasn't quite sweet enough in my opinion. I did schmear some lemon curd on my muffin which made it a little better, but seriously if you have to doctor up your muffin, that is usually an indication to me that I am not in love.

However, I did learn a valuable baking lesson. When my Mom was in town she purchased flour that was unbleached, for her pizza dough. And it is what I had in the house and so I used it for this recipe. And it made my muffins dark, kind of whole wheat looking, not quiet as pretty as the picture in the book. I was also wondering if this flour had anything to do with the fact that my muffins were more dense than the picture looked, but I had baked cookies and other things with this flour and the impact was minimal, so I don't think that was it. I also analyzed whether or not I over mixed the muffin batter, but I did the very least amount of mixing for fear of gut bombs, so I am chalking it up to a recipe that is just ok.

This recipe came from a cookbook, don't know how I ended up with it, called The Back in the Day Bakery Cookbook. It does not look like something I would normally purchase so it must have been a gift, I assume. This is a book that includes recipes from a bakery in Savannah, that has the same name as the book, and everything in it looks amazing in the photos, but hopefully the other recipes provide me with more success than this one did.

The recipe was really easy. Combine the dry ingredients, which included cinnamon, and I did like the hint of spice in the muffins.

Combine the wet ingredients. I used my buttermilk powder for the first time and for a cup of buttermilk you use 4T of buttermilk powder and a cup of water. It seemed to work great and looked similar to buttermilk when I combined the two. I also liked that the recipe had almond and vanilla extract, which gave it an interesting flavor.

Next add the wet ingredients to the dry ingredients and fold in the chopped peaches. Peaches are incredible this time of year!! I purchased white peaches for this recipe and they were incredibly sweet!

Put in a muffin pan, that is sprayed with cooking spray and bake.

I did love how much these muffins puffed up and they look like perfect little muffins, which is nice.
Here is the recipe if you want to try it and please let me know if you get different results:
INGREDIENTS
2 cups unbleached all-purpose flour
3/4 teaspoon baking powder, preferably aluminum-free
1 teaspoon baking soda
1 teaspoon fine sea salt
1/2 teaspoon ground cinnamon
3/4 cup granulated sugar
1 cup buttermilk
5 tablespoons vegetable oil
1 large egg
3/4 teaspoon pure vanilla extract
1/2 teaspoon pure almond extract
1 1/2 cups peeled, cubed (1/2-inch cubes) fresh or unthawed frozen peaches
Turbinado sugar for sprinkling
DIRECTIONS
Position a rack in the lower third of the oven and preheat the oven to 350 degrees F. Lightly spray 12 large muffin cups with vegetable oil spray or line them with paper muffin cups.
In a large mixing bowl, whisk together the flour, baking powder, baking soda, salt, cinnamon, and granulated sugar.
In another bowl, whisk together the buttermilk, oil, egg, vanilla, and almond extract. Pour the wet ingredients over the dry ingredients and mix just until combined. Gently fold in the peaches, using as few strokes as possible; be careful not to over mix.
With a large ice cream scoop or spoon, scoop the batter into the prepared muffin cups, filling them approximately two-thirds full. Sprinkle the tops with turbinado sugar.
Bake for 25 to 30 minutes, until the muffins are golden brown. The tops should be firm to the touch and a toothpick inserted in the center of a muffin should come out clean. Remove from the oven and let cool for 10 minutes.
Turn the muffins out of the pan and enjoy warm or at room temperature. The muffins can be stored in an airtight container for up to 2 days.
Well I am working night shift tonight, so wish me luck in regards to staying awake. I am definitely out of practice when it comes to late nights, since a crazy night for me is cooking dinner, having a glass of wine and falling asleep on the couch. Woot Woot!! Cheers!
Saturday, August 24, 2013
A little food A.D.D. & My First Wine Box Experience
So let me just start by saying I have very bad self-diagnosed life A.D.D. but when it comes to food and wine it is ten times worse. Tonight I had grandiose plans of making Corn Pancakes with Smoked Salmon and Lemon Chive Cream, but that just didn't happen. I got home after working out with my personal trainer and I was physically exhausted. I sat down and started working on my book and after several hours of diggin' deep into my past I was mentally exhausted...but starving!!
I knew I needed to go to my happy place, which for me is always the kitchen. So I poured myself a glass of wine and decided to start cooking. This is where it all began...

Let's start with the wine. The other day at the grocery store I saw this cute little box of wine and although I remember my Grandparents having boxed wine when I was a kid, I had never had it myself. Yes, I developed wine snobbery at a very young age. However, when I looked at the back of the box, it said this boxed wine had won awards. It had received 88 points at the 2011 Ultimate Wine Challenge...sure I have no idea what that is, but it sounds impressive, right? And it won 86 points at the 2011 California State Fair. Now I knew about the state fair as I went once in college and sure I don't remember seeing any wine, but that was awhile ago. I do remember the highlight, for me, was seeing the Budweiser clydesdales. Yes, I know that is a random fact and it has nothing to do with wine and Budweiser is yucky, but it is the truth.
Anyway I digress, I bought the cute little box of wine. It is a 2011 Merlot from Lathrop, which is in Central California. And I kind of suckered myself in because on the box it talks about environmental stuff, like how the box is made primarily with paper which is a renewable resource and how it has a smaller carbon footprint than a wine bottle. So seriously if I am drinking for an environmental cause, how can I go wrong, right?
And I have to say it isn't half bad. I don't think I would make an effort to search it out, but it is fruity and smooth and it is easy to drink. This is definitely a great alternative for a picnic or a beach adventure because it is small, non-breakable and tasty. And you get three glasses out of this cute little box...yeah I don't know if that is a good thing or bad thing either, but it just is.
Ok but back to dinner. So I got into the kitchen and I was starving and I just didn't feel like spending too much time in the kitchen. Plus I am one of those people who definitely eats based on feel. That is why I have never been able to be one of those people who shops for a week in advance, with a well thought out and calculated menu 7 days in advance. Because for me I get to day 2 and day 5 and day 6 and I have no desire to eat the meal I planned for. And yes, I know this is bad, but I pretty much go to the grocery store every day, based on what I feel like cooking and eating for that day.
Tonight was no different, I did not feel like making corn pancakes and smoked salmon, but I did have bok choy and that sounded awesome to me. I actually thought of taking my spinach recipe from the other night and just doing it again, but with bok choy, but seriously what kind of blog would that be. So thankfully for google I found another recipe that was similar but a tad bit different. I made Baby Bok Choy with Cashews.

Ok but I did a few things differently. I cooked this more like a stir fry, so I did not use a lid. I also wanted a little spice so I added some red pepper flakes which added a nice kick to it. But all and all this was a great light and fresh dish. I loved the flavor of the sesame oil, the bite of the garlic and the salt and crunch from the cashews.

And just one more thing about my A.D.D, while I was cooking I decided I needed a bottle of water.So I went to the fridge, opened the door and saw the Parmesan cheese. I had just bought it yesterday at Fresh and Easy and so I was curious as to the quality. I ended up with this instead of my bottled water and even as I write this I still don't have my bottle of water. Hmmm....

This was the perfect low maintenance, tasty and easy dish for my Saturday night. Hell there are a few benefits to being single...I can have boxed wine and bok choy for dinner, seriously how do you beat that? Cheers!!
I knew I needed to go to my happy place, which for me is always the kitchen. So I poured myself a glass of wine and decided to start cooking. This is where it all began...

Let's start with the wine. The other day at the grocery store I saw this cute little box of wine and although I remember my Grandparents having boxed wine when I was a kid, I had never had it myself. Yes, I developed wine snobbery at a very young age. However, when I looked at the back of the box, it said this boxed wine had won awards. It had received 88 points at the 2011 Ultimate Wine Challenge...sure I have no idea what that is, but it sounds impressive, right? And it won 86 points at the 2011 California State Fair. Now I knew about the state fair as I went once in college and sure I don't remember seeing any wine, but that was awhile ago. I do remember the highlight, for me, was seeing the Budweiser clydesdales. Yes, I know that is a random fact and it has nothing to do with wine and Budweiser is yucky, but it is the truth.
Anyway I digress, I bought the cute little box of wine. It is a 2011 Merlot from Lathrop, which is in Central California. And I kind of suckered myself in because on the box it talks about environmental stuff, like how the box is made primarily with paper which is a renewable resource and how it has a smaller carbon footprint than a wine bottle. So seriously if I am drinking for an environmental cause, how can I go wrong, right?
And I have to say it isn't half bad. I don't think I would make an effort to search it out, but it is fruity and smooth and it is easy to drink. This is definitely a great alternative for a picnic or a beach adventure because it is small, non-breakable and tasty. And you get three glasses out of this cute little box...yeah I don't know if that is a good thing or bad thing either, but it just is.
Ok but back to dinner. So I got into the kitchen and I was starving and I just didn't feel like spending too much time in the kitchen. Plus I am one of those people who definitely eats based on feel. That is why I have never been able to be one of those people who shops for a week in advance, with a well thought out and calculated menu 7 days in advance. Because for me I get to day 2 and day 5 and day 6 and I have no desire to eat the meal I planned for. And yes, I know this is bad, but I pretty much go to the grocery store every day, based on what I feel like cooking and eating for that day.
Tonight was no different, I did not feel like making corn pancakes and smoked salmon, but I did have bok choy and that sounded awesome to me. I actually thought of taking my spinach recipe from the other night and just doing it again, but with bok choy, but seriously what kind of blog would that be. So thankfully for google I found another recipe that was similar but a tad bit different. I made Baby Bok Choy with Cashews.

Ok but I did a few things differently. I cooked this more like a stir fry, so I did not use a lid. I also wanted a little spice so I added some red pepper flakes which added a nice kick to it. But all and all this was a great light and fresh dish. I loved the flavor of the sesame oil, the bite of the garlic and the salt and crunch from the cashews.

Baby Bok Choy with Cashews Recipe
INGREDIENTS
- 2 Tbsp olive oil
- 1 cup chopped green onions, including green ends
- 3 cloves garlic, chopped
- 1 pound baby bok choy, rinsed, larger leaves separated from base, base trimmed but still present, holding the smaller leaves together
- 1/2 teaspoon dark sesame oil
- Salt
- 1/2 cup chopped, roasted, salted cashews
METHOD
1 Heat olive oil in a large sauté pan on medium high heat. Add onions, then garlic, then bok choy. Sprinkle with sesame oil and salt. Cover, and let the baby bok choy cook down for approximately 3 minutes. (Like spinach, when cooked, the bok choy will wilt a bit.)
2 Remove cover. Lower heat to low. Stir and let cook for a minute or two longer, until the bok choy is just cooked.
3 Gently mix in cashews.

This was the perfect low maintenance, tasty and easy dish for my Saturday night. Hell there are a few benefits to being single...I can have boxed wine and bok choy for dinner, seriously how do you beat that? Cheers!!
Friday, August 23, 2013
Chocolate Cheesecake & My Running Club
So tonight was a party for my running club. We were all getting together to celebrate our 31 day running challenge. And it was funny, it was kind of like when you are a kid and you run into your teacher at the grocery store, but they aren't wearing their ugly teacher sweaters so you don't totally recognize them. Tonight was similar, we are all use to seeing each other in running clothes, no make-up and our hair pulled back in ponytails so it was super cool to see everyone and to see just how gosh darn cute everyone really is.

We really have an amazing group! We have super dedicated and motivational leaders, we have a non-competitive supportive group of men and women and we all have that sarcastic sense of humor, of which I am pretty partial to.
I volunteered to make dessert and because it is me...well of course I had to make something I hadn't made before...seriously how do you pass up an opportunity to have 20 built in guinea pigs. So I decided to make a chocolate cheesecake and let me just say this recipe was amazing!! It has a graham cracker crust, which I always just love! Seriously, how do you go wrong with butter, sugar and graham crackers. Yum!! The filling has a chocolate chocolate chip layer and a white sour cream layer. This cheesecake is just downright decadent. The first layer reminds me of a chocolate mousse and the second layer is just cheese heaven! This recipe is definitely a keeper in my book!!

And I love those recipes that look like you slaved in the kitchen for days, however it really was fairly labor unintensive, is that even a word? Well it is now!!

So the crust is just graham cracker crumbs. I put graham crackers and place them in a ziplock bag and just break them down with my hands. I know that other people use a rolling pin or a meal mallet or a hammer, however I found that my hands work just fine. Combine the graham cracker crumbs with sugar and melted butter and mush onto the bottom and sides of your pan.

Next in a mixing bowl, combine the softened cream cheese, sugar, cocoa powder and vanilla. Add the eggs and blend until combined. Stir in the chocolate chips. Bake in the oven for 20 minutes and cool for 15 minutes.

The next layer consists of sour cream, vanilla and more sugar. Spread on top of the chocolate layer and bake for another 10 minutes.

Let the cheesecake cool and then place in the fridge. Holy yummy goodness!!
GRAHAM CRUST (recipe follows)
2 packages (8 oz. each) cream cheese , softened
3/4 cup plus 2 tablespoons sugar , divided
1/2 cup HERSHEY'S Cocoa
2 teaspoons vanilla extract , divided
2 eggs
1 cup HERSHEY'S SPECIAL DARK Chocolate Chips or HERSHEY'S Semi-Sweet Chocolate Chips
1 container (8 oz.) dairy sour cream
Directions
1 Prepare GRAHAM CRUST. Heat oven to 375°F.
2 Beat cream cheese, 3/4 cup sugar, cocoa and 1 teaspoon vanilla in large bowl until light and fluffy. Add eggs; beat until well blended. Stir in chocolate chips. Pour into prepared crust.
3 Bake 20 minutes. Remove from oven; cool 15 minutes. Increase oven temperature to 425°F. Stir together sour cream, remaining 2 tablespoons sugar and remaining 1 teaspoon vanilla in small bowl; stir until smooth. Spread evenly over baked filling.
4 Bake 10 minutes. Remove from oven to wire rack. With knife, loosen cake from side of pan. Cool completely; remove side of pan. Refrigerate several hours before serving. Cover; refrigerate leftover cheesecake. 10 to 12 servings.
GRAHAM CRUST: Stir together 1-1/2 cups graham cracker crumbs and 1/3 cup sugar; add 1/3 cup melted butter or margarine in medium bowl; mix well. Press mixture firmly onto bottom and halfway up side of 9-inch spring form pan.
The night was really a lot of fun! It was great to share a few glasses of wine instead of Gatorade, eat pizza instead of Gu and talk about running without sucking air because you are at a dead sprint on a Sunday morning run. I had never been in a running club before and I truly did not know what to expect, but I really love the camaraderie of the group and they are truly what motivates me to get my lazy ass out of bed early just about every Sunday morning.
I also want to take a second and give a special shout out to KM. Thank you for being our fearless leader and thank you for our certificates, my road ID and my "commitment" pin. Loved our gifts!
And I think my cheesecake was a success...just sayin'.

Thursday, August 22, 2013
Side Dish-Garlic Sesame Spinach
As I write this tonight I am watching Chopped. I love these cooking shows, but I am just not a good timed Chef. I love to lolly-gag in the kitchen, taking my time and savoring the culinary experience. I love my jazz music and my glass of wine while I cook and for some reason these shows usually don't allow those luxurious...seriously what are they thinking? The favorite part of these shows for me involve the revelation of mystery ingredients and tonight when they opened the basket all I could think was,"dang I would be screwed." However, once I started to analyze the ingredients I was pleasantly surprised as my culinary mind kicked into gear and I actually thought of a use for everything. The ingredients included:


- Pickle juice-perfect for flavoring in any dish, love the salt and the dill flavors
- Fish carcass-looks disgusting, but I could use it to make a stock
- Herb stems-could be pureed to add flavor in any dish or cooked with the fish carcass to enhance the flavor of the stock
- Over ripe tomatoes-definitely puree them because those suckers are not pretty
They are also allowed additional ingredients from the pantry. So the challenge has 20 minutes and this is what I came up with...I would do a gazpacho with the tomatoes and I would add charred red peppers and cucumbers. I would add the fish stock I made from the carcass, the pickle juice and the herb stems. And once everything is in the blender I think it would come together, especially with a bit of spice and seasoning...maybe chipotle peppers with adobo sauce, cumin, salt and pepper. I think some grilled shrimp on top would take it to the next level...think I might actually need to try this.

However, tonight I decided to make an easy, fresh and veggie side dish for dinner. I have been craving spinach and after the gym all I wanted was something easy with a glass of wine that would allow me to sit my ass in front of the TV and think mindless thoughts.
As a side note, this is a crazy time at my day job, as we are going through a computer replacement project. So I am definitely realizing just how much of a saviour my gym and cooking time really is. This next month, I have no doubt that these elements of my life will keep me sane. Cheers to surviving this computer project!!
So I made Food Network's Garlic Sesame Spinach:
Cook 8 to 10 garlic cloves and a pinch of red pepper flakes in a skillet with vegetable oil until the garlic is golden. Add 10 cups baby spinach and cook until wilted; add a big splash of water and some salt. Top with toasted sesame seeds and drizzle with sesame oil.
The only thing I did differently was use olive oil instead of veggie oil.

I love sesame!! So the sesame oil and sesame seeds added great flavor to the spinach. Plus I just feel healthy every time I eat spinach. My only complaint about this recipe, which has nothing to do with this recipe, is the fact that you put two giant bags of spinach into a pot and just like magic you have one serving.

I also have to say I love bagged spinach. When it comes to spinach, I am not a culinary purist, that will only eat it if you cut it and clean it yourself. I remember as kid, complaining to my Mom every time she served me spinach. And it wasn't because I hated the flavor or the texture, it was because of the dirt. I remember always telling her there was dirt in my spinach and for some odd reason she just never had any sympathy. And believe me it wasn't because she grew the spinach herself or failed to wash it, it was just that I grew up before bagged spinach was readily available and so she washed it herself, often leaving sand or dirt granules on the leaves for my little teeth to find. Grrrr!!!
It is my Friday night and so now that I have spent some time with all of you, I am going to go back to my glass of wine and my episode of Chopped! Sweet dreams!!
Wednesday, August 21, 2013
Caramel Corn Cookies
So I wasn't one of those kids that was raised on caramel corn, of any variety, I did not have Cracker Jacks or Crunch-n-Munch or even homemade caramel corn until I was a teenager. Remember I had a hippie Mom who did not allow that crap to pass my lips. And I would love to be able to say that I have maintained that level of purity, however I can't lie to you all.

A few weeks ago I came across a recipe for Caramel Corn Cookies in a Food Network Magazine and it became my goal to make them. I actually had a hard time finding plain caramel corn so I ended up with Crunch-n-Munch. On a side note I love the name Crunch-n-Munch, seriously how random and how fun to say!!

Now just in case you are inquisitive like I am, let me tell you what I learned about Crunch-n-Munch. It started in 1966 by the Franklin Nut Company. Buttery toffee was the original flavor, but it has branched out since then, hence allowing me to find caramel. However, my burning Crunch-n-Munch question has gone unanswered, and yes I tried google, how did Crunch-n-Munch get it's name?
But get this, in 2004, the Yankees tried to start selling Crunch-n-Munch in place of Cracker Jacks. But there was a public outcry and they had to go back to traditional baseball food. Seriously, what were they thinking?
Since I did use Crunch-n-Munch it did vary the recipe slightly, just because Crunch-n-Munch is not pure popcorn, it also has peanuts, but in my opinion my cookies did not suffer from that addition. I loved the caramel flavor, the hint of almond flavoring from the extract and the coconut. As many of you know I love coconut in anything and these cookies definitely maintained my love.

This cookie recipe is incredible easy. Everything is mixed in one bowl. The butter and sugar are creamed in a mixer. Then I just took the mixer bowl off the mixer and added in the rest of the ingredients.
1/2 cup sugar
1/2 cup vegetable shortening
1 cup caramel corn, chopped
1 large egg
1/2 teaspoon almond extract
3/4 cup all-purpose flour
1/2 teaspoon baking powder
1/2 teaspoon baking soda
1/2 cup quick-cooking oats
1/2 cup sweetened flaked coconut
Directions
Preheat the oven to 350 degrees F and line 2 baking sheets with parchment paper. Beat the sugar and shortening in a large bowl with a mixer on medium-high speed until light and fluffy, about 3 minutes. Add 1/3 cup chopped caramel corn and the egg and mix with a wooden spoon until well combined. Stir in the almond extract, flour, baking powder, baking soda and the remaining 2/3 cup caramel corn. Stir in the oats and coconut.
Drop spoonfuls of dough onto the prepared baking sheets, about 2 inches apart; bake until golden, 10 to 12 minutes. Let cool 5 minutes on the baking sheets, then transfer to racks to cool completely.

On a side note, I bought way too much Crunch-n-Munch because I couldn't remember how much the recipe called for when I was at the store. So if you want the Crunch-n-Munch either to make these cookies or just to snack on, please hit me up. Happy Hump Day or Wine Wednesday or anything else that you happen to be celebrating! Cheers!
Tuesday, August 20, 2013
Culinary School Top Ten
So last night was my last class of culinary school. It is hard to believe that is has already been 6 months. It feels like just yesterday that I was being fitted for that ugly uniform, purchasing my knives and walking into my class nervous and excited. We have our final project in a month, we are tasked with putting on a banquet for 100 people, however we have completed our classes. All of the skills, knowledge and abilities that were meant to be imparted have been passed on and the rest is on us to put them into practice.
Since this class was the culmination of 24 weeks of food, food and more food, I decided to put together my culinary school top ten. Don't worry I will end with some food porn from our last class.
Danah's Culinary School Top Ten
- Getting nicknamed "precious" by the instructor and knowing that it is not a term of endearment.
- Stabbing and killing a live lobster. Even though it only screams in a pot of boiling water, you truly feel like you can almost hear it scream.

- Puff pastry-I still hate it and I vouch to only buy it from the frozen food section of the grocery store for eternity

- Being a knife wielding ninja...my knife skills have really improved immensely and I am so proud of them for that
- Finally getting to take off that ugly hat...I have a new found appreciation for Chefs as that hat is just down right itchy and uncomfortable
- Dishes...I have never done so many dishes in my entire life...I was a dish whore for 24 weeks and I survived
- Getting yelled at for making polenta and game and cooking by the recipe instead of by feel and sight...except that is a challenge when you haven't made something before and you aren't sure what it is supposed to look or feel like
 |
| This paella was probably one of my favorite dishes |
- Realizing that sausage casings look like used condoms...considering becoming a vegetarian...never mind that is too extreme...but still grossed out

- Cutting a chicken...I am so proud of myself for getting over that fear

- Dropping my homework outside of class....

I do have to say that all joking aside, truly the field trips were incredible...dim sum, farmers market, Japanese grocery store, Thai food, etc. I learned so much from touching, feeling and tasting. Truly an overall amazing sensory experience!!So on our final night of class we played with advanced sauces and this was the incredible food we made:
 |
| Moroccan Chicken |
 |
| Lamb w/Polenta |
 |
| Persian Rice w/Sour Cherries & Saffron |
 |
| Poached pears |
I am truly so thankful and blessed to have an amazing group of classmates, teachers assistants and instructors. The laughs, pranks, dishes and experiences were incredibly memorable! And a special shout out to my culinary school buddy who at least once a night had me crying from laughing so hard. Can't wait to see you in a tutu!!! As a side note, my culinary school buddy and I decided to take ballet together next...ok let's be honest he still isn't totally on board with this suggestion...so I am trying to guilt trip him by putting this in my blog. Sweet Food Dreams!!
Subscribe to:
Posts
(Atom)
Visit My Website!


