Saturday, June 29, 2013
Basil Mojitos & Shrimp Nachos
So this weekend is hot! Actually it is the hottest weekend we have had so far this year. And obviously when it is hot it is hard to motivate yourself to want to turn on the oven, slave over a hot stove and heat up the house even more. So when my bestie and I decided to make dinner last night we had to think of something light, refreshing and that did not require a lot of stove time.

Of course the first thing I thought of was....hmmm cocktails. I had recently read a recipe in Sunset magazine for Basil Mojitos and I thought they just sounded like a slice of heaven. As many of you know, last weekend I tried to make Mint Juleps. I just loved the tradition behind them, they sounded so refreshing and festive and I hated them. They were just too sweet, I didn't like the taste of bourbon and the mint was too over powering. So in a second attempt to find my summer cocktail I decided to try these mojitos...and I am in love. I loved the earthy spicy flavor of the basil, the citrus from the lime, the hint of sugar and the refreshing nature of the rum and club soda. We have a winner folks!!
And I loved the fact that I got to use a cocktail shaker. It is hard not to feel super classy as you shake the ice and cocktail mixture and pour it into a class. These seriously were amazing cocktails for a warm summer night on the patio! And I am thrilled that my quest is over...well for now...for my cocktail of choice...well for the moment!

Here is the recipe if you want to try it or you can just come over because I will definitely be making these again:
About 10 large basil leaves, divided
1/4 cup plus 4 tsp. superfine sugar, divided
1/4 cup lime juice
1/2 cup white rum
About 1/2 cup cold club soda
Lime wedges
Preparation
1. Whirl 2 basil leaves and 1/4 cup sugar in a food processor until well blended; transfer to a plate and set aside.
2. Put 6 to 8 remaining basil leaves in a large cocktail shaker with a few ice cubes, the remaining 4 tsp. sugar, and lime juice. Muddle the mixture with the back of a thick wooden spoon, keeping your hand over the top to prevent spilling, until basil has broken up.
3. Add rum and a few more ice cubes to shaker, cover, and shake to blend. Rub a lime wedge along rim of 2 lowball glasses and dip in basil sugar (reserve remaining sugar for more cocktails). Add a few ice cubes to each glass. Remove top from shaker (do not strain), and divide mixture between glasses. Top off each with club soda and stir. Garnish with a lime wedge.
And although we did think of just drinking mojitos all night we decided we should probably make dinner. My bestie is a nacho fiend, she will seriously do anything for nachos, she actually probably dreams of nachos. So I found this recipe for Spicy Shrimp Nachos, and the rest was history. The shrimp are seasoned with brown sugar and jerk seasoning and the nachos are made with pepper jack cheese and mango salsa. They have the perfect amount of spice, the mango salsa makes them very crisp and refreshing and the shrimp gives just a hint of sweet.
So first make the mango salsa which includes well mango, red pepper, jalapeno and red onion. Just chop and combine in a bowl. Easy!

Next peel and devein the shrimp, then toss with the jerk seasoning and brown sugar. Cook these on a grill or grill pan until they are opaque, mine took about 5 minutes to cook.

Just a quick funny story, I was trying to decide if my pan was hot enough so I threw one shrimp in the pan to hear it sizzle or not sizzle. So my bestie looks in the pan and says,"oh crap are we cooking these one at a time." I started laughing, could you imagine the time it would take to cook one shrimp at a time for a plate of nachos. Damn how I love that girl!

Spread the chips on a cookie sheet and sprinkle with cheese, shrimp and mango salsa. I did get teased as I bought yogurt cheese. I thought it sounded interesting and I didn't even think of the fact that it may melt differently or taste odd. Yogurt cheese is lactose free and it is supposed to be lower in fat. My bestie was definitely a little peeved that I defiled her nachos with low fat cheese, but I got lucky in that it tasted fine and melted perfectly. Phew, disaster averted!!

Broil the nachos for 2 minutes and eat them!!
ingredients
1 cup mango, seeded, peeled, and chopped
1 medium red sweet pepper, chopped
2 tablespoons finely chopped red onion
1 fresh jalapeno chile pepper, seeded and finely chopped*
2 tablespoons packed brown sugar
2 tablespoons Jamaican jerk seasoning
1 pound peeled, deveined uncooked shrimp
Nonstick cooking spray
8 cups tortilla chips (8 oz.)
4 ounces Monterey Jack cheese with jalapeno peppers or Monterey Jack cheese, shredded
directions
1. Preheat broiler. For salsa, in a bowl stir together mango, sweet pepper, onion, and chile pepper; set aside. In a large bowl stir together brown sugar and jerk seasoning. Add shrimp and toss to coat. Coat a grill pan or large skillet with cooking spray. Heat over medium-high heat. Add half the shrimp at a time to the pan. Cook for 1 to 2 minutes each side or until shrimp are opaque. Remove and set aside. If desired, coarsely chop shrimp.
2. Spread tortilla chips on a broiler-safe platter or baking sheet. Top with shrimp and salsa. Sprinkle with cheese. Broil 4 inches from heat for 1 to 2 minutes or until heated through and cheese is melted.

This was definitely the perfect summer meal! And it was great paired with The Bachelorette and Real Housewives of New Jersey. I do have to say I am just sick of the Theresa and Melissa feud, get over it all ready! Definitely a perfect night! Thank you to my bff for also being the best food/cocktail photographer and well best friend, obviously! XOXO

Tuesday, June 25, 2013
Culinary School #14-Eggs
So let me start with an apology as there is no blog entitled "Culinary School #13," as I did not make it to last weeks class. I missed salad night y'all and I am very sorry if I disappointed you. I do have the recipes, however, so if we want to do a class #13 of our own we can. However, I came back with a vengeance last night, on egg night, and I do have to say that I think I made it a memorable night for all.
Let me start with the most valuable lesson. We had to make a fried egg and we had to flip it. Well I have never been one of those girls that could flick her ingredients around a pan with the slight movement of her wrist and last night proved to be no different. We were supposed to break the egg in the pan, flick the pan and flip the egg to the other side and finish cooking it. Well I learned that when you flick your egg it is not supposed to go air born as it tends to break, it is hard to catch and it pretty much makes a giant disaster. Voila!!

The assistant instructor was pretty much crying she was laughing so hard...so I consider it a success. My second attempt was a tad bit better, but I still definitely have room for improvement.

Last night was seriously a fun night for kitchen tools. I learned about a cherry pit remover. I have never been a cherry fan, primarily because of the pits and so this little tool could make me a believer. Plus it was easy and fun to use.
The cherries were then made into a Cherry Clafouti:

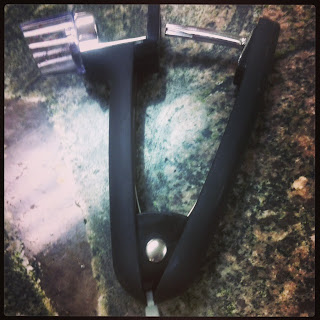
I also discovered this cool tool that removes the skin from the garlic cloves. Just put the garlic clove in this contraption, roll it around and voila no more skin. Yes, I know it kind of looks like a water weanie or a sex toy, but I promise you it is neither, well at least we didn't use it as such last night. I guess I shouldn't make promises I can't keep.

The third fun kitchen tool was this egg cracker. You put this on top of the egg, lift the handle and let it go with a bit of power and it cracks the top of an egg, allowing you to use a knife to take the top of the egg off.

You dump the egg and you have a little egg cup.

We stuffed them with scrambled eggs, whipped cream and caviar. On a side not LP you have spoiled me, this caviar just wasn't the same and there was no champagne, beautiful indoor garden and well it just paled in comparison to our experience.

Now let me share with you some fun egg info I learned:


Let me start with the most valuable lesson. We had to make a fried egg and we had to flip it. Well I have never been one of those girls that could flick her ingredients around a pan with the slight movement of her wrist and last night proved to be no different. We were supposed to break the egg in the pan, flick the pan and flip the egg to the other side and finish cooking it. Well I learned that when you flick your egg it is not supposed to go air born as it tends to break, it is hard to catch and it pretty much makes a giant disaster. Voila!!

The assistant instructor was pretty much crying she was laughing so hard...so I consider it a success. My second attempt was a tad bit better, but I still definitely have room for improvement.

Last night was seriously a fun night for kitchen tools. I learned about a cherry pit remover. I have never been a cherry fan, primarily because of the pits and so this little tool could make me a believer. Plus it was easy and fun to use.

The cherries were then made into a Cherry Clafouti:

I also discovered this cool tool that removes the skin from the garlic cloves. Just put the garlic clove in this contraption, roll it around and voila no more skin. Yes, I know it kind of looks like a water weanie or a sex toy, but I promise you it is neither, well at least we didn't use it as such last night. I guess I shouldn't make promises I can't keep.

The third fun kitchen tool was this egg cracker. You put this on top of the egg, lift the handle and let it go with a bit of power and it cracks the top of an egg, allowing you to use a knife to take the top of the egg off.

You dump the egg and you have a little egg cup.

We stuffed them with scrambled eggs, whipped cream and caviar. On a side not LP you have spoiled me, this caviar just wasn't the same and there was no champagne, beautiful indoor garden and well it just paled in comparison to our experience.

Now let me share with you some fun egg info I learned:
- To tell the difference between a hard boiled egg and a raw egg, spin it. The hard boiled egg will spin.
- When you are making eggs for an omelet you should not use a whisk as it adds to much air. You should use a fork.
- Eggs should always be at room temperature when they are cooked. You do not want to add a cold substance to a hot pan.

- The higher the yolk the fresher the egg. See how the egg above is elevated over the white, that is a fresh egg.
 |
| My omelet looks like a banana slug |
We also had the pleasure of each attempting to make an omelet and Hollandaise sauce.

In the past I have used a blender to make Hollandaise sauce, but we had to do it by hand. Let me just say it takes a lot of whisking! This is the method we used, putting the bowl over a pan of hot water and then taking it off, whisking continuously.

My first batch broke, but the second batch came out perfect!
 |
| Eggs Benedict |
Last night the recipe I was responsible for was the Eggs Jeanette A La Mere de Jacques Pepin. It is basically a deviled egg that is fried and served with a dijon mustard sauce. Dear God this recipe was heaven! Legend has it that this recipe was created by Jacques Pepin's Mom, but I will be honest I don't care who created it...this was yummy!

We also made cheese souffles. They were beautiful and my culinary school buddy described them as tasting like light and fluffy Cheez-its...love that!

All and all it was a fun class. Next week is appetizers! Cheers! And Mom if you are reading this we learned that if you use a little cornstarch it makes phyllo dough easier to use. When I was a kid my Mom would have temper tantrums while making Spanokapita with phyllo dough. XOXO Love you Mom!
Saturday, June 22, 2013
Culinary Adventure: Chuck E Cheese
So as most of you know I grew up in Eureka, a small town in Northern California, in the County of Humboldt. It is also known as the emerald triangle, well because of the marijuana, but also because it is like stepping back in time when you are up there. It also kind of traps you and you can't get away. Anyway it is not a place that really embraces chains and so I grew up in a place with no Chuck E Cheese. I know, what kind of childhood could I possibly have had without the Chuck E Cheese experience.

So one day I was talking to one of my besties and she was talking about her kids bday party at Chuck E Cheese. I happened to mention that I have never had the pleasure of experiencing this large mouse in person. So she made it her goal to give me that experience and yesterday that is exactly what she did.

We got to Chuck E Cheese at 130 W Hillcrest Dr in Thousand Oaks at 11am. We were ready to play games, dance with the mouse and eat some pizza. She was actually concerned about whether or not I wanted to eat there, but I told her I truly needed the full experience. Let me just say I have seriously been missing out. This place was happening! It was filled with 50 kids in orange shirts, probably some summer camp, and 25 other random kids and their families, all excited to share in my maiden Chuck E Cheese voyage.
One of the most interesting things I learned about Chuck E Cheese is that it is pedophile proof, well maybe not proof, but it tries to decrease the accessibility. Every kid and adult has to get a stamp so you can't wander off with extra kids. Thought that was a good plan until the end when they couldn't find my friends daughters stamp and they let us take her anyway. This was even funnier because we are both brunettes and her daughter has platinum blond hair and doesn't look a whole lot like either one of us. Oopsie!
So as soon as we got there we decided to place our order. We ordered pizza and salad and...get this...Chuck E Cheese has wine!! So of course we had to order it, right? We had 2 options-pink or white. We asked about red, but that just wasn't an option, so we opted for pink.

And we were both pretty thrilled by the fact that our wine came out of a keg, in the wall, always a good sign, right? NOT! But don't worry it did not stop us from drinking it.

Then we got to play games. I learned how to play skeeball, seriously a good time! I also got to play hoops...hmmm not my area of expertise at 5'4.

And I played "pig out" which is a game where you shoot balls into a pigs mouth as he opens and closes it...had to play it just because of the food theme.

I do have to say that the staff was amazing. They were all super helpful and one guy was pretty amazed that I was a Chuck E Cheese virgin. He asked me if I grew up in Canada, but alas I had to break his pretty little 15 year old heart when I told him I actually grew up in Nor Cal. He did ask me how he could make my first experience memorable? For clarification, we are still talking about Chuck E Cheese. So my friend recommended letting me experience the "ticket blaster," wow what a memorable event!

If you are unfamiliar with the ticket blaster it is a booth that you stand in, which blows air at you and blows tickets in the air. The goal is to catch the tickets, but I did not excel at this area. However, I did have really good wind blown dance moves, if I do say so myself.
One of the other highlights was trying to get our picture taken with the Chuck E Cheese statue in the car photo booth. However, we quickly learned that this car was designed for people even shorter than myself, so it was not the most successful of photos.
 Sorry, for a little bit there I forgot I was a food blog, just because I was so enamored by the environment. Anyway we got our pizza and salads. And I have to say the pizza wasn't bad. We had a pizza that had half pepperoni and half sausage. It was perfect for what it was! You don't go to Chuck E Cheese looking for the world's best pizza, you go for a fun time, some great games and some good 'ol family bonding. However, if you want to know how many calories are in your food they are posted on the menu board. Wow that was a buzz kill!!

Now I thought you would like to know some random Chuck E Cheese facts. Did you know?

So one day I was talking to one of my besties and she was talking about her kids bday party at Chuck E Cheese. I happened to mention that I have never had the pleasure of experiencing this large mouse in person. So she made it her goal to give me that experience and yesterday that is exactly what she did.

We got to Chuck E Cheese at 130 W Hillcrest Dr in Thousand Oaks at 11am. We were ready to play games, dance with the mouse and eat some pizza. She was actually concerned about whether or not I wanted to eat there, but I told her I truly needed the full experience. Let me just say I have seriously been missing out. This place was happening! It was filled with 50 kids in orange shirts, probably some summer camp, and 25 other random kids and their families, all excited to share in my maiden Chuck E Cheese voyage.
One of the most interesting things I learned about Chuck E Cheese is that it is pedophile proof, well maybe not proof, but it tries to decrease the accessibility. Every kid and adult has to get a stamp so you can't wander off with extra kids. Thought that was a good plan until the end when they couldn't find my friends daughters stamp and they let us take her anyway. This was even funnier because we are both brunettes and her daughter has platinum blond hair and doesn't look a whole lot like either one of us. Oopsie!
So as soon as we got there we decided to place our order. We ordered pizza and salad and...get this...Chuck E Cheese has wine!! So of course we had to order it, right? We had 2 options-pink or white. We asked about red, but that just wasn't an option, so we opted for pink.

And we were both pretty thrilled by the fact that our wine came out of a keg, in the wall, always a good sign, right? NOT! But don't worry it did not stop us from drinking it.

Then we got to play games. I learned how to play skeeball, seriously a good time! I also got to play hoops...hmmm not my area of expertise at 5'4.

And I played "pig out" which is a game where you shoot balls into a pigs mouth as he opens and closes it...had to play it just because of the food theme.

I do have to say that the staff was amazing. They were all super helpful and one guy was pretty amazed that I was a Chuck E Cheese virgin. He asked me if I grew up in Canada, but alas I had to break his pretty little 15 year old heart when I told him I actually grew up in Nor Cal. He did ask me how he could make my first experience memorable? For clarification, we are still talking about Chuck E Cheese. So my friend recommended letting me experience the "ticket blaster," wow what a memorable event!

If you are unfamiliar with the ticket blaster it is a booth that you stand in, which blows air at you and blows tickets in the air. The goal is to catch the tickets, but I did not excel at this area. However, I did have really good wind blown dance moves, if I do say so myself.
One of the other highlights was trying to get our picture taken with the Chuck E Cheese statue in the car photo booth. However, we quickly learned that this car was designed for people even shorter than myself, so it was not the most successful of photos.


Now I thought you would like to know some random Chuck E Cheese facts. Did you know?
- Chuck E Cheese started as a rat but in 1997 he became a mouse
- The middle name of Chuck E Cheese is Entertainment
- The restaurant opened in 1977
- The founder of Chuck E Cheese, also founded Atari
- The first location was in San Jose but there is now 542 of the restaurants
- In 2012 Chuck E Cheese underwent a makeover to make him look more like a rock star...oh thank god for that
All and all I have to say I had a great time and I truly felt like a kid again, at least for a few hours. The staff was really awesome and like I said the pizza wasn't bad for a normal run of the mill pizza place. I don't know if I will go back, just because since I don't have any kids, that might be a tad bit creepy, but I definitely walked away with some fond Chuck E Cheese memories. Cheers!
Friday, June 21, 2013
Baking with coconut oil...
So a few weeks ago I was at a friends house for a bbq and one of the guests was a nutritionist. He started talking about how olive oil was bad for you and coconut oil was a much better alternative. So we cooked everything that night in coconut oil. The grilled vegetables were brushed in coconut oil, the chicken had coconut oil...the house seriously smelled like heaven...kind of like walking into a macaroon factory. Ok sure I have never been to a macaroon factory, but it was what I envisioned a macaroon factory smelling like...that's fair, right? Anyway everything tasted great. So when I stumbled upon this recipe for Strawberry Tarts with Ginger Nut Crust and it called for coconut oil as the fat I decided to give it a try.

And I know you are going to ask me what I learned about olive oil being bad for you, but let me be honest I am probably one of olive oils biggest fans. So when he started talking bad about olive oil I took that time to wander off and get more wine. Sorry!
But lets talk about the positive attributes of coconut oil. For the longest time coconut oil had a bad rap as it is high in saturated fat. Remember those days when we all thought that all fat was bad or all saturated fat was bad, but further research has shown differently. The recent research has found that coconut oil actually has a great deal of health benefits. Coconut oil has a saturated fat called lauric acid which actually helps increase the good HDL cholesterol and lower cholesterol levels overall. It also can help the bodies immune system, especially as it relates to fighting off viruses, bacteria, fungus and yeast. There has also been a great deal of research with coconut oil and diabetic patients as it has been shown to help with insulin use in our bodies. Finally, it helps with thyroid function which can help to increase metabolism and increase digestion. All good things!

I do have to say it was pretty funny that I did all this research on coconut oil because of this brief bbq conversation and a recipe for strawberry tarts, only to find that this recipe called for a whopping 2 teaspoons!! Yup I am sure those 2 teaspoons will make my body function like a champ! Well at least now I have a whole bottle of it so I can continue to explore coconut oil uses in even more detail. I have also learned in my research that coconut oil is great for your skin and your hair so I can always just lather it all over my body and hair, lay down a tarp in the back yard and use it like a slip and side...never fear I always have a back-up plan.
Ok back to the tarts. So these are a great low calorie dessert option. They are only 190 calories each. And they are easy to make, which as you all know is definitely the way to my heart.

So in a food processor, combine 2 cups of nuts. The recipe says you can use pecans, walnuts or almonds. I used almonds which worked fine, but I probably will use toasted pecans next time, just to give it a little more of that nutty flavor. The almonds were a little subtle in my opinion. Process the nuts until they are coarsely ground. Add the agave nectar, coconut oil, flour, ginger and salt and process until combined.

Quick side story about agave nectar. I had a recipe a few weeks ago for a strawberry cocktail that I wanted to make that called for agave nectar. So I went to the grocery store to buy the ingredients and for some reason I just assumed agave nectar would be a juice, ya know like mango nectar or raspberry nectar...and amazingly I couldn't find any. So I bought the mango nectar and just assumed I had to substitute it. So I was talking to my best friend about it and she was like, did you look on the syrup aisle? Um no! She was laughing so hard that she could outsmart my food knowledge. Win for her! So E this is your shout out! Nice job with the agave nectar! And sure enough I found it on the syrup aisle...the strawberry cocktail was nasty btw.

Back to the recipe. Take a muffin pan and oil it with some more coconut oil. Press the nut mixture into the pan, covering the bottom and the sides of the muffin cups. Chill for 1 hour. Bake in a 350 degree oven for 8-10 minutes and chill.

Slice 1lb fresh strawberries. Combine with more agave nectar, vanilla bean and fresh lemon juice.
Once the tarts are cooled fill with the strawberry mixture. I drizzled some chocolate syrup over my tarts...well because that is just how I roll.
2 teaspoons coconut oil, melted, plus more for pan
2 cups pecans, walnuts, or almonds
5 tablespoons agave syrup (nectar), divided
2 tablespoons whole wheat flour
1 teaspoon ground ginger
1/2 teaspoon fine sea salt
1 pound fresh strawberries, hulled, sliced
1 teaspoon fresh lemon juice
1 vanilla bean, split lengthwise
Special Equipment
A 12-cup muffin pan
Ingredient Info
Agave syrup and coconut oil are available at natural foods stores and some supermarkets.
Preparation
Lightly brush muffin cups with coconut oil. Set aside. Pulse nuts in a food processor until coarsely ground. Add 3 Tbsp. agave syrup, flour, ginger, salt, and 2 tsp. coconut oil. Process until coarse dough forms. Gather into a ball. Press 1 heaping Tbsp. dough firmly onto bottom and up sides of each muffin cup. Chill for 1 hour.
Preheat oven to 350°. Bake crusts until firm and golden around edges, 8–10 minutes. Let cool in pan on a wire rack for at least 10 minutes before removing. DO AHEAD: Can be made 1 day ahead. Let cool completely; store airtight at room temperature.
Place strawberries, lemon juice, and remaining 2 Tbsp. agave syrup in a medium bowl; scrape in vanilla seeds (save bean for another use). Stir well, crushing a few berries to release their juices.
Using a spatula or butter knife, remove tart shells from pan and fill with strawberry mixture. Serve immediately

These were great little summer desserts. They would be excellent with a nice light sparkling wine or pinot grigio or rose or even a riesling. The tarts were not too sweet and I loved the nut flavor and the sweet strawberries, very complimentary. I couldn't really taste the coconut oil, but you could smell it which was nice. And I also really liked the hint of spice that the ginger provided. Nice touch!
Have a great weekend my friends and cheers!
Tuesday, June 18, 2013
Poaching...it isn't just for eggs...Poached Salmon w/Avocado Sauce
So tonight was the first time I poached something other than eggs. And I have to admit I was a little nervous about poaching fish. It is just hard to tell if it's done. And it is a little scary just throwing hot liquid on a fish and calling it done. I know that my fear makes absolutely no sense at all, especially since I am one of the biggest sushi fans on the planet...and yes I know that it is raw fish...but when fish is supposed to be cooked...you want it cooked, right? Yes, I know it is totally a psychological mind F*#k.

Anyway, tonight I poached salmon. I figured this has got to be good as it is a Bon Appetit recipe and they have been pretty darn successful for a few years (understatement of the year). So I tried it! First you season the salmon with salt, pepper and fresh tarragon.


Meanwhile, you make my favorite part of the dish...the avocado sauce. In a food processor, puree the avocado, yogurt, cumin, lime juice, salt and pepper.

Yum! This is almost like a creamier, tangier guacamole. I could have seriously just eaten this part by the spoonful...ok a few did end up in my mouth. But I knew I needed it for the dish...so I put the spoon down...hard but necessary!

Next you make the "salad" portion. Combine the arugula, sliced cherry tomatoes, shallots, peas, olive oil and salt/pepper. I have very rarely had shallots raw, but these were good. They added a nice crunch to the dish and the flavor of the shallots complimented the spice of the arugula. If you are unfamiliar with arugula it is in the lettuce family, but it has a peppery taste.
Finally, you place the avocado mixture on the place and put the fish on top. You can either serve the arugula salad between the avocado and fish layer or as a side, like I did. The flavors meld very well together, so just have fun with it!
Here is the full recipe:
2 8-ounce skinless salmon fillets (preferably wild), halved crosswise
Kosher salt, freshly ground pepper
20 fresh tarragon leaves, torn
1 quart vegetable broth
2 cups stringed trimmed sugar snap peas or snow peas
2 ripe avocados, halved, pitted
1 cup plain low-fat yogurt
1 tablespoon (or more) fresh lime juice
1/2 teaspoon ground cumin
4 cups arugula
20 grape or cherry tomatoes, halved
1 tablespoon minced shallot
1 tablespoon plus 1 teaspoon olive oil
2 tablespoons thinly sliced fresh chives
4 lime wedges
Preparation
Season fish with salt and pepper. Place in an 8x8x2" or 9x9x2" metal or glass baking dish. Scatter half of tarragon over fish. Let sit at room temperature for 10 minutes
Bring broth to a boil in a small pot. Pour over salmon to submerge. Let stand until cooked to medium-rare, 10–15 minutes. Using a spatula, transfer to a plate; chill.
Cook sugar snap peas in a pot of boiling salted water until crisp-tender, about 2 minutes. Using a slotted spoon, transfer peas to a bowl of ice water. Let cool; drain. Cut larger snap peas in half on a diagonal.
Scoop avocado flesh into a food processor. Add yogurt, 1 Tbsp. lime juice, and cumin; purée. Season to taste with salt, pepper, and additional lime juice, if desired.
Spoon about 1/2 cup avocado purée into the middle of each plate. Mix remaining tarragon, peas, arugula, tomatoes, and shallot in a medium bowl. Drizzle with 1 Tbsp. oil; season with lime juice (if desired), salt, and pepper. Toss; divide among plates. Top with salmon and chives; drizzle each fillet with 1/4 tsp. oil. Serve with lime wedges
Overall, this dish has a great diversity of flavors. The salad has a peppery taste from the arugula which is complimented from the tanginess of the tomatoes and the spice of the shallots. It is also complimented in texture with the olive oil. The salmon has a nice, salty flavor from the vegetable broth and it is enhanced with the creamy texture of the avocado sauce. This dish is great served with a pinot gris or a sauvignon blanc in my opinion. And seriously trust the timing on the poaching...my fish was cooked to perfection. Cheers!
Wednesday, June 12, 2013
Potato Chip Chocolate Chip Cookies...yup 2 types of chips
Yesterday I truly made the world's best PMS cookie. I found a recipe on www.allrecipes.com for potato chip cookies. So I did what every woman in the United States of America would do and I bought a bag of ruffles. My plan was either to sit down with that bag and eat the whole thing while I watched reality tv or crunch it up into small pieces and throw it into my cookies. Duh!

I do have to say that although I looked at the potato chip cookie recipe and thought,"dang I must make these." I also thought to myself,"something is missing." And as soon as I started making them I knew exactly what my little heart desired in order for these cookies to truly be perfection...CHOCOLATE!! Sure I am a salt/sweet addict just like the next girl, but when you add a bit-o-chocolate and a glass of wine I am a HAPPY GIRL!!
I was thrilled when I started making these for several reasons...they were super easy to make, they look like chocolate chip cookies so you can disguise the potato chips and you have leftover potato chips. Therefore, I could accomplish both of my fantasies...making potato chip cookies AND eating a bag of chips while watching reality tv. LOVE STORY!!
So cream the shortening and the sugars together in a mixer. Add in the eggs and vanilla. Then mix in the flour, baking soda and salt. Yes, I said salt. Sure there are salty potato chips, but this recipe calls for more salt...how awesome is that!!

Stir in the potato chip crumbs. I made my crumbs by putting potato chips in a ziplock bag and just squishing them. Since I decided to add chocolate chips I did half of the batch in its true form and half with chocolate chips so I could do my own private taste test. And although they are both good I really liked the ones with chocolate chips...like I had any doubt that the chocolate would be anything but delightful.

Here is the recipe:
INGREDIENTS:
1 cup shortening
1 cup white sugar
1 cup brown sugar
2 eggs
1 teaspoon vanilla extract
2 cups all-purpose flour
1 teaspoon baking soda
1/2 teaspoon salt
2 cups crushed potato chips
1 cup chopped walnuts (optional)
** I added 1 bag of semi-sweet chocolate chips **
DIRECTIONS:
1. Preheat oven to 350 degrees F (175 degrees C).
2. In a large bowl, cream together the shortening, white sugar, and brown sugar until light and fluffy. Add the eggs one at a time, beating well with each addition, then stir in the vanilla. Combine the flour, baking soda, and salt; gradually stir into the creamed mixture. Finally, fold in the potato chips and walnuts. If you are using the chocolate chips stir them in at this point. Drop by rounded spoonfuls onto an unprepared cookie sheet.
3. Bake for 8 to 10 minutes in the preheated oven. Allow cookies to cool on baking sheet for 5 minutes before removing to a wire rack to cool completely.
And to make things even better when I brought the cookies to work they were a huge hit. Most people agreed they would never have known the secret ingredient...Ruffles, if I hadn't told them. And they went so fast that when I dropped them off at 1430 they were gone before my night shift (whom I made them for) got to work. I think that is success, what do you think?

So if you are looking for an easy, fun and tasty cookie recipe definitely give this one a try. They definitely resemble chocolate chip cookies but with a slightly salty and crunchy addition. Yum!
Tuesday, June 11, 2013
Culinary School #12-Game
I wish I was talking about Scrabble, Monopoly, Candy Land or even Hungry Hungry Hippos because last night was a rough one for me. I was squeamish over the subject matter and I was just having an off day, which continued into the class. I have ordered and eaten game at restaurants, in the past, and some of it I can even say I am a fan of. However, seeing it prior to preparation, looking like a cute little bunny or a feathered friend, was a rough one for me. I know that ignorance about what we eat is not the answer, but last night I was thinking it sounded like a pretty damn good idea.
On a side note let me say that last night was officially the half way mark for the completion of culinary school, which is a pretty large landmark for me. We are starting to talk about our final project and I am starting to see the light at the end of the tunnel. At this point I am still pretty sure of the fact that I do not see myself working the line in a kitchen. I really realized last night that I love to cook for the pleasure of it. I love trying new things, getting lost in the kitchen, being unattached to the results and just enjoying the creative nature of cooking. It is definitely my stress release and because I deal with life and death decisions every day at work, I do not want to get too attached to my polenta not being the perfect consistency, I just want to enjoy the moment and learn something new. Cooking is for personal enjoyment, gratification, nurturing and sharing for me.
So my group was responsible for duck, braised rabbit and quail last night....all of which I had never cooked before.

We started with the quail and once I saw the tray of baby birds, I truly expected them to stand up and start dancing, oh wait maybe that was the nightmare I had last night after I came home.

The last time I saw a quail was when I accidentally ran one over with my car so it was bizarre to be trying to shove it full of stuffing, tying it up and putting it in the oven. I have to admit the quail was the only thing I did not try last night, the thought of breaking its little bones and putting it in my mouth was just too much for me.

I really enjoyed cooking the duck. It was strange to see the words "mallard" on the package and know that I run by their relatives every morning when I run the arroyo, but I quickly put that out of my head. I learned how to score the duck breast, through the fat, so as to reduce shrinkage as it cooks and to help render the fat. I pan fried the duck breast and then finished it in the oven to give it that crispy duck skin that everyone loves so much.
I did also learn that regardless of the meat you are serving, you should never serve it with the bones facing towards the diner. I googled this to try and figure out why, but I didn't find the answer. During this search I did learn that in India you are supposed to eat and receive food with your right hand...hmm that would be a challenge and probably a bit messy for me...since I am left handed. There goes my trip to India!
I also tried venison last night and that was actually probably my favorite dish. The venison tenderloin was sliced and breaded in flour and cooked. I learned that with venison, and also with beef, when the juices start to surface, that is an indicator to flip it over. That is definitely a tip that I will remember and use.
Now as for my culinary school word of the day, I learned that gastrique is caramelizing vinegar and sugar in a pan, normally to create a sauce of sorts. This technique was used for the orange duck sauce.
The highlight of the night for me was learning how to make strudel. I truly don't think I will ever do this again, but I loved the camaraderie of the experience. I definitely have a new appreciation for strudel making as it is labor intensive and more complex than I expected. Strudel is Austrian and it became popular in the 18th century. Legend has it that the Austrian Emperor's chef said strudel dough is supposed to be thin enough to read a love letter through it. Hmmm....ok.
The most impressive part of the strudel process is definitely the stretching. It starts as a ball of dough and initially it starts getting worked, kind of like a pizza crust.

From there it continues to get stretched, adding more people and more hands, as the dough gets stretched to a larger and larger size and a thinner and thinner consistency.

The dough eventually ends up the size of a dining room table.

The strudel is always stretched on a tablecloth or piece of fabric, which is used to roll it up. So once the dough is stretched, it is filled. We did a traditional apple strudel so we filled it with an apple and sugar mixture.

Next you start using the tablecloth to fold the dough over and manipulate it without breaking it.

Strudel can be sweet or savory, however in the US, apple strudel is what we are most familiar with. Did you all know that the word strudel means "whirlpool," because the rolled version of a strudel looks like, well a whirlpool.

After we spent all of this time creating the dough, rolling it and babying it, we were then told that most people today use phyllo dough. Ok got it, so from here on out, I will be buying puff pastry and phyllo dough. Good to know!!

 |
| Rabbit Wrapped in Prosciutto w/Mushroom Sauce |
On a side note let me say that last night was officially the half way mark for the completion of culinary school, which is a pretty large landmark for me. We are starting to talk about our final project and I am starting to see the light at the end of the tunnel. At this point I am still pretty sure of the fact that I do not see myself working the line in a kitchen. I really realized last night that I love to cook for the pleasure of it. I love trying new things, getting lost in the kitchen, being unattached to the results and just enjoying the creative nature of cooking. It is definitely my stress release and because I deal with life and death decisions every day at work, I do not want to get too attached to my polenta not being the perfect consistency, I just want to enjoy the moment and learn something new. Cooking is for personal enjoyment, gratification, nurturing and sharing for me.
 |
| Quail |
So my group was responsible for duck, braised rabbit and quail last night....all of which I had never cooked before.

We started with the quail and once I saw the tray of baby birds, I truly expected them to stand up and start dancing, oh wait maybe that was the nightmare I had last night after I came home.
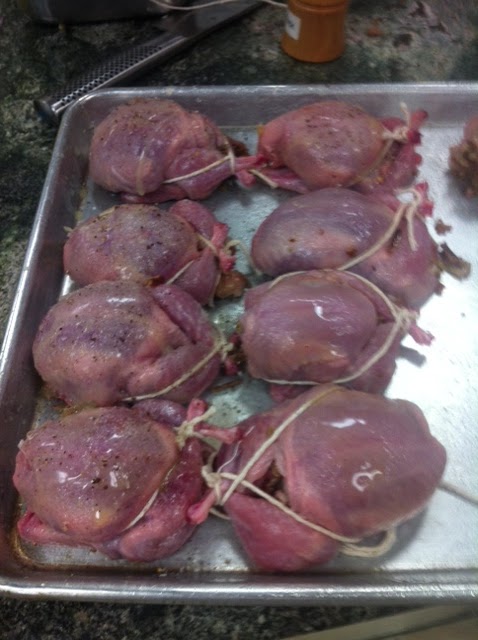
The last time I saw a quail was when I accidentally ran one over with my car so it was bizarre to be trying to shove it full of stuffing, tying it up and putting it in the oven. I have to admit the quail was the only thing I did not try last night, the thought of breaking its little bones and putting it in my mouth was just too much for me.

I really enjoyed cooking the duck. It was strange to see the words "mallard" on the package and know that I run by their relatives every morning when I run the arroyo, but I quickly put that out of my head. I learned how to score the duck breast, through the fat, so as to reduce shrinkage as it cooks and to help render the fat. I pan fried the duck breast and then finished it in the oven to give it that crispy duck skin that everyone loves so much.
 |
| Mallard Duck |
I did also learn that regardless of the meat you are serving, you should never serve it with the bones facing towards the diner. I googled this to try and figure out why, but I didn't find the answer. During this search I did learn that in India you are supposed to eat and receive food with your right hand...hmm that would be a challenge and probably a bit messy for me...since I am left handed. There goes my trip to India!
I also tried venison last night and that was actually probably my favorite dish. The venison tenderloin was sliced and breaded in flour and cooked. I learned that with venison, and also with beef, when the juices start to surface, that is an indicator to flip it over. That is definitely a tip that I will remember and use.
 |
| Venison |
Now as for my culinary school word of the day, I learned that gastrique is caramelizing vinegar and sugar in a pan, normally to create a sauce of sorts. This technique was used for the orange duck sauce.
 |
| Duck with Orange Sauce |
The highlight of the night for me was learning how to make strudel. I truly don't think I will ever do this again, but I loved the camaraderie of the experience. I definitely have a new appreciation for strudel making as it is labor intensive and more complex than I expected. Strudel is Austrian and it became popular in the 18th century. Legend has it that the Austrian Emperor's chef said strudel dough is supposed to be thin enough to read a love letter through it. Hmmm....ok.
The most impressive part of the strudel process is definitely the stretching. It starts as a ball of dough and initially it starts getting worked, kind of like a pizza crust.

From there it continues to get stretched, adding more people and more hands, as the dough gets stretched to a larger and larger size and a thinner and thinner consistency.

The dough eventually ends up the size of a dining room table.

The strudel is always stretched on a tablecloth or piece of fabric, which is used to roll it up. So once the dough is stretched, it is filled. We did a traditional apple strudel so we filled it with an apple and sugar mixture.

Next you start using the tablecloth to fold the dough over and manipulate it without breaking it.

Strudel can be sweet or savory, however in the US, apple strudel is what we are most familiar with. Did you all know that the word strudel means "whirlpool," because the rolled version of a strudel looks like, well a whirlpool.

After we spent all of this time creating the dough, rolling it and babying it, we were then told that most people today use phyllo dough. Ok got it, so from here on out, I will be buying puff pastry and phyllo dough. Good to know!!

Subscribe to:
Posts
(Atom)
Visit My Website!


